


Way before college, back in elementary school, I was already a budding science nerd. But my fascination with science was on a larger scale (as opposed to my college focus on molecular and cell biology), leaning more towards things that could be seen by the naked eye, like animals, plants, the rainforest, and fossils. One topic that really captured my attention was outer space. I was obsessed with anything and everything related to it: the stars, the moon, planets, black holes, comets, etc.

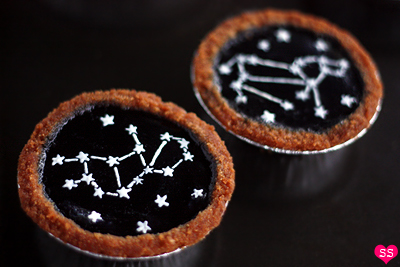
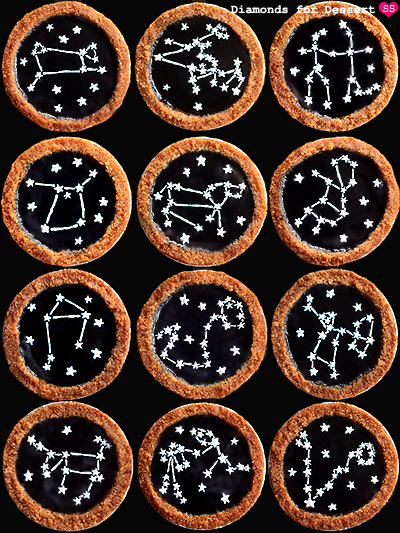
Today's post is inspired by that childhood interest in outer space. Beyond science, stars in particular were interesting to me as they formed bright connect-the-dot images in the night sky, appealing to my visual nature. Moreover, tying in Greek and Roman mythology, each constellation has its own story, which made them all the more fascinating. Thus, I really wanted to base a baking project on constellations. Since blueberries go so well with cheesecake, I thought I could play around with a recipe and make something constellation related with a blueberry glaze acting as the night sky.
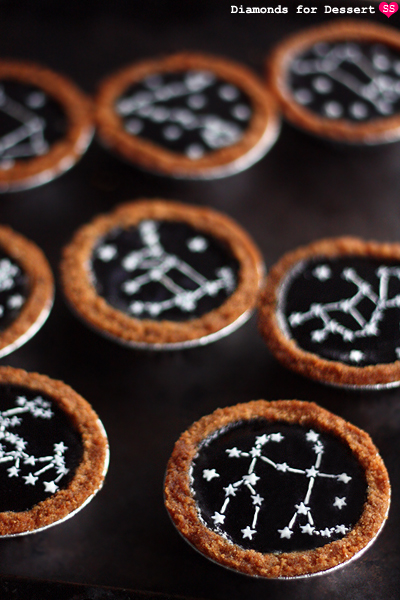
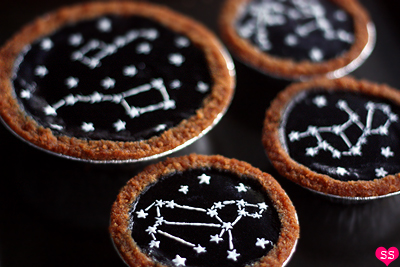
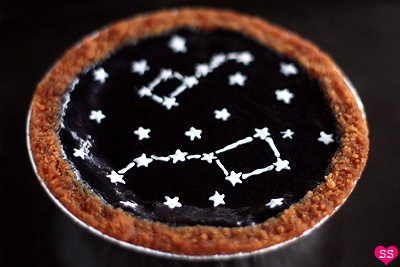
What I ended up with was this recipe. They're basically simple mini cheesecakes, but instead of baking them in muffin liners, I made them in mini tart pans, forming cheesecake tarts (which also increases the crust to filling ratio, and as I've mentioned before, I'm a crust person). I strained my preserves and added a bit of gelatin to the jam glaze so that it would set smoothly, giving me a flat surface to decorate. And finally, I made many little white chocolate stars to place on top of each cheesecake in the form of a variety of constellations, completing my constellation cheesecake tarts.
Constellation Cheesecake Tarts
Graham Cracker Crust1 1/2 cups graham cracker crumbs
1/4 cup sugar
1 stick butter, melted


Mix the graham cracker crumbs with the sugar. Add the melted butter and mix. The crust mixture should have the texture of wet sand. Take the mixture and press into tart pans sprayed with nonstick spray. Preheat oven to 375°F.


For small tarts, I used 3-inch diameter tart pans (9th item down on left in link), like the ones used for egg tarts. If you choose to skip the crust on the rim, and use 2 1/2 tbsp crust mixture in each cup. If you want the rim crust, use 3 tbsp crumb mixture in each cup. (It's up to you whether you want that rim crust or not. It can be a bit difficult to press the mixture into a crust on such a small cup, so if you want the easier way, skip the rim crust.)
For large tarts, I used aluminum pot pie pans
Cheesecake Filling
2 packages (16 oz) cream cheese, room temperature
1/2 cup sugar
2 eggs
1 tsp vanilla extract


Preheat oven to 350°F. Mix cream cheese with sugar. Add in eggs one at a time, mixing after each addition. Mix in the vanilla extract. Bake tarts for 20-30 minutes. They're ready once the filling is set.
Remove from oven and let cool on a wire rack. (Don't worry if the filling puffs up in the oven. It'll fall back down once cooled. And cracks will be covered up by the glaze.)
Decorating the Tarts
Blueberry Glaze
1 cup strained blueberry preserves
2 tbsp hot water
1/2 tbsp gelatin
a few drops blue food coloring


Put the strained preserves in a small saucepan. Add 1 tbsp water to the preserves. Mix in the food coloring so the preserves are more blurple than reddish purple. In a separate bowl, mix the gelatin and 1 tbsp water together so that all the gelatin grains are wet.
Place the saucepan over low heat. Add the wet gelatin. Heat the mixture until all the gelatin is dissolved. Then remove from heat. Let cool a few minutes to slightly thicken. Pour the glaze over each cheesecake tart and use a spoon to spread the glaze so that all the cream cheese is covered and only the crust is visible.
Cool the glazed cheesecakes in the refrigerator a few hours for the glaze to set.
White Chocolate Stars
white chocolate (or white candy melts)
toothpick


Melt your white chocolate. Place a dot of white chocolate on a piece of parchment paper. Quickly, use the toothpick to push the dot of chocolate in five directions to form the five arms of the star as shown in the illustration above. Allow to dry. Lightly press on the back of the parchment paper to release the stars for use.
Finishing Up
glazed cheesecake tarts
white chocolate stars
white chocolate

Place stars on the glazed cheesecakes like in the illustration above. If you don't position it exactly as you want it, take a toothpick and lightly push on the side of a star to move it around. (For large tarts, use the first photo in this post with the little and big dipper or use multiple constellations of your own choice).
Once the stars are positioned, melt the white chocolate and use a toothpick to draw the lines between the stars with the melted chocolate. Finally, take the leftover stars and place them randomly on each cheesecake to fill the empty space.
Makes 14-16 small cheesecake tarts or 8-9 large cheesecake tarts


Wow, that's so cute! Looks very labour intensive creating the stars, am so impressed!
ReplyDeleteThanks! Making the stars wasn't as tough as it looks. It took a little practice to figure out a good technique for moving the toothpick around to tranform the chocolate blobs into stars, but after a few, it was pretty quick.
Deletewow these are so cute but they must have taken a long time!
ReplyDeletePlacing the stars was probably the only time consuming part (but that happened to also be my favorite step). Baking the cheesecakes and glazing them was pretty quick and easy.
DeleteTo me, it seems like using royal icing and just piping on the stars and such would be much faster. I SO want to do these and will try piping on the constellations with royal icing.
DeleteIf its any time in the near future I'll try reporting back on how it goes.
this is totally amazing. i can't believe you made your own stars! kudos on another beautiful dessert!
ReplyDeleteThanks! I was originally going to use star sprinkles, but the ones I bought ended up being too big for my mini cheesecakes, so I decided to make my own. They weren't too tough to make though.
DeleteWow, you made all those stars?! That's incredible.
ReplyDeleteBlimey, well done you on making all those stars. I know that I would have broke down and used my star plunger cutter myself, lol.
ReplyDeleteThey're all equally awesome. Nice work.
I did think about somehow using a cutter to make the stars, but I like to keep it simple tool-wise so I stuck to just a toothpick. It really isn't too hard once you get the hang of it.
DeleteYou are so creative!
ReplyDeleteThese little guys are incredible! Suh a cute idea.
ReplyDeleteThis is just genius. So creative and they look dee-lish as well. Wow!
ReplyDeleteAbsolutely gorgeous post! Love the idea and the creativity behind it! That little instructional drawing on how to make the stars is really cool! I totally appreciate all the work that went into making these! Thanks for sharing this with us...
ReplyDeleteYour posts are always so incredibly beautiful and thought out. On a more basic note, love the idea of a cheesecake tart - I'm definitely a crust person too!
ReplyDeleteThese are utterly amazing! I'm also a biologist (though I'm more on the marine and ecology side of things) but used to be fascinated by space when I was younger (actually I still find it fascinating!). I find your creativity so inspiring!!
ReplyDeleteNow look, you TOTALLY rocked this dessert. I love it! And if you don't mind, I just might "steal it" and use it at an upcoming party that I'll produce. It's creative, looks really cool, and I can just tell - it tastes fantastic too!
ReplyDeleteDo you have an RSS feed subscription area/button/widget, whatever? I'd love to subscribe! Going to look for it. Because maybe I overlooked it. ???
Thanks! My RSS Feed link is in the right sidebar, under the search box.
DeleteHello! I just found this post from Tastespotting and WOW. I'm blown away. I would love to make this soon for a get together, but have no tart pans! Do you think a muffin pan would work?
ReplyDeleteIf not, I'll just save this recipe for another star-gazing day. :) Thanks for your creativity and beautiful pictures!
Thank you. I think a muffin pan could work, just that it might be a bit more difficult pressing the crust/removing them from the pan, but it's always worth a shot (just make sure you spray the pans well so the crusts don't stick).
DeleteIf you're in the US, Keebler makes Mini Graham Cracker Crusts that already come in small aluminum pans that I've seen in the baking section in grocery stores and in some drugstores. They aren't as small as my mini tarts (their size falls somewhere in between the size of my mini and larger tarts).
Or if you'd rather make the larger tarts, I found my disposable aluminum pot pie pans at Safeway with the other aluminum bakeware. (For pies, I tend to use disposable bakeware since I don't make them all that often.)
This is a very creatie project...
ReplyDeleteI am homeschooling my toddler so I am in search of really cool activities at home, (by the way she really loves kitchen activities)
This will be very helpful we she matures and will be ready for advanced science lessons...Page, bookrmarked. Thanks for sharing.
I love it. Baking and science combined!
DeleteWhoa! I am so in love with these little cheesecakes! You are so talented and creative. I will need to give these a try, doubt they'll look even half as good as your designs. :)
ReplyDeleteSusan - these cheesecakes are crazy good! Well done, major effort! Looking fwd to following your blog now I've foudn you, maybe you can follow mine if you like what you see? Cheers to a good year ahead! CQx
ReplyDeleteThis is too cool! You are so creative! I always love your little drawing tutorials too :)
ReplyDeleteBtw, I’m hosting my first blog giveaway today so check it out :)
http://littlerandomhappiness.blogspot.com/2012/03/bonjour-mon-amis.html
I love cheesecake and this is the perfect way to eat something you love and celebrate:) Thanks for all the great information.
ReplyDeleteThese are great! I featured them on twitter. I would love to link to you but I can't seem to find you on twitter. Do you have an account? Happy baking!
ReplyDeletehttps://twitter.com/#!/discover_create/status/180013458182512640
-Discover. Create.
Thanks for featuring my post! Nope, I'm not on twitter yet. I'm definitely contemplating it thought.
DeleteGreat works of art! Looks heavenly!
ReplyDeleteWow, these are amazing! But I don't think I'd ever have the patience to make and place all those stars! How long did it take you to make all those?!
ReplyDeleteMaking the starts didn't take that long once I got the hang of flicking the toothpick to make the points. And placing the stars wasn't too difficult since I was basically copying the constellation picture above.
DeleteThese are amazing! It combines two of my loves: cheesecake and stars! I will definitely try these out :) I bet they'd be a hit at a party.
ReplyDeleteThis so needs more views!