


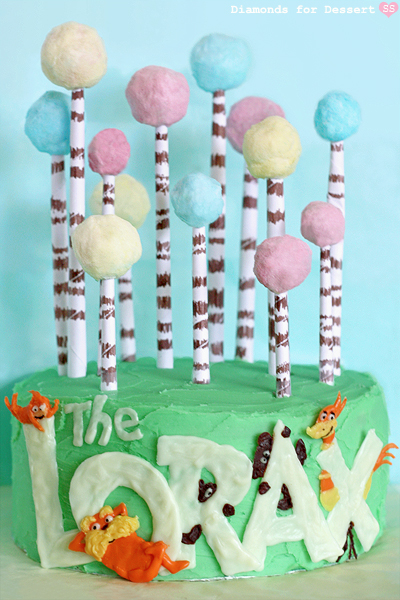
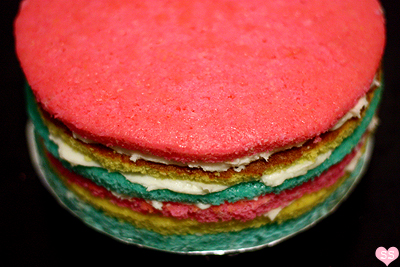
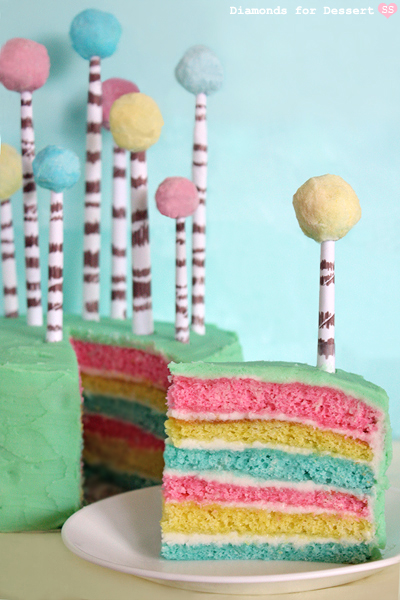
I love the film's soft and colorful animation. The truffula trees look nice and fluffy, like cotton candy, which is what inspired me to make this cake. I thought a multicolored layer cake decorated with cotton candy truffula trees would be cute, with the color of the cake layers matching the colors of the cotton candy. It's a basic white cake tinted pink, blue, and yellow (inspired by Whisk Kid's Rainbow Cake). To finish, I altered one of the posters for The Lorax movie to feature not only the Lorax, but also some Swomee-Swans, Bar-ba-loots, and Humming-fish to make a colorful decoration for the side of the cake.

The Lorax Cake
Classic White Cake
adapted from Baking Bites
1 cup milk, room temperature
6 egg whites
1 tsp almond extract
1 tsp vanilla extract
3/4 cup (1 1/2 sticks) butter, room temperature
2 1/4 cups flour
1 3/4 cups sugar
4 tsp baking powder
1 tsp salt
pink, blue, yellow gel food coloring
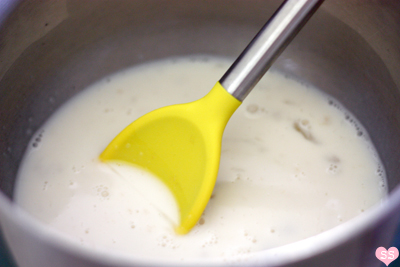
Preheat oven to 350°F. Spray three 8-inch diameter round cake pans with nonstick spray and line the bottoms with parchment paper. Set aside for the moment. Mix the milk, egg whites, almond extract, and vanilla extract in a small bowl.
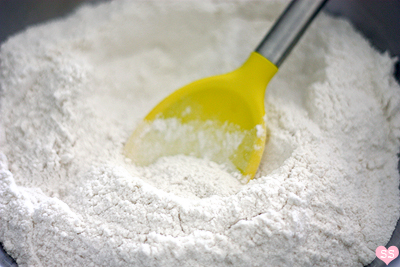
In a large bowl, combine the flour, sugar, baking powder, and salt. Rub/cut in the butter until the mixture looks like wet sand. Add 1/2 the milk mixture and stir. Then add the second half of the milk mixture and stir.
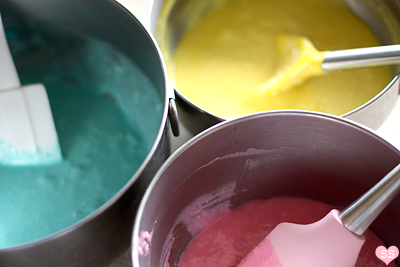
Divide the cake batter into 3 bowls (about 1 1/2 cups batter per bowl). Add 2 drops pink food coloring to one bowl, add 2 drops yellow food coloring to another bowl, and add 2 drops blue food coloring to the last bowl.

Pour the three cake batters into the three previously prepared cake pans. Place the pans in the oven and bake for 20 minutes, or until a toothpick comes out clean. Let cakes cool in the pans about 10 minutes, then flip the cakes onto cooling racks and let totally cool to room temperature.
Easy Vanilla Frosting
adapted from The America's Test Kitchen Family Baking Book
1 1/2 cup (3 sticks) butter, room temperature
3-4 cups powdered sugar
3 tbsp milk
2 tsp vanilla extract
1 tsp almond extract
green food coloring

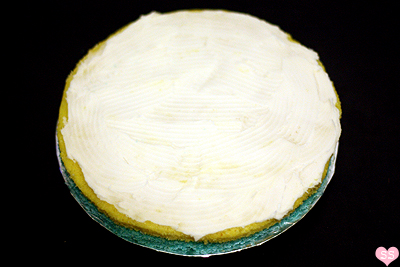
Cream the butter. Mix in 3 cups of powdered sugar. Add the milk, vanilla extract, and almond extract. Then if necessary, mix in more powdered sugar, adding it 1/4 cup at a time until you reach desired consistency. Now frost your cake as indicated in instructions below.

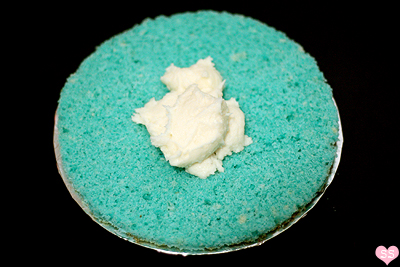
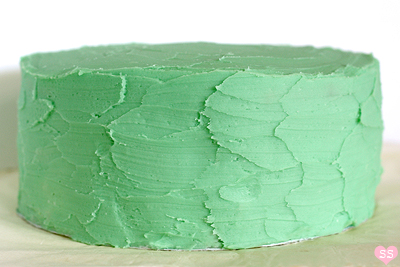
After the cake layers are stacked and the crumb coat is done, tint the remaining frosting with green food coloring and use that for the final layer of frosting.
Frosting the Cake
pink, blue, yellow cake layers
white and green vanilla frosting
cake board
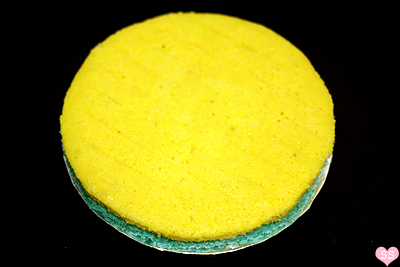
Slice each cake layer in half lengthwise so you end up with two thin pink layers, two thin blue layers, and two thin yellow layers.


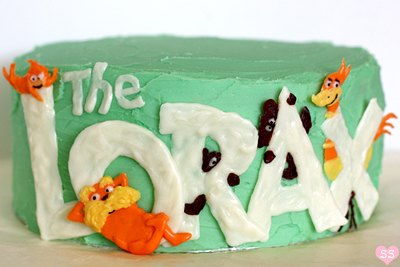
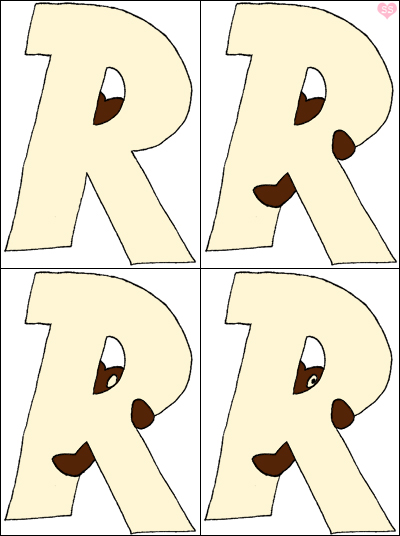
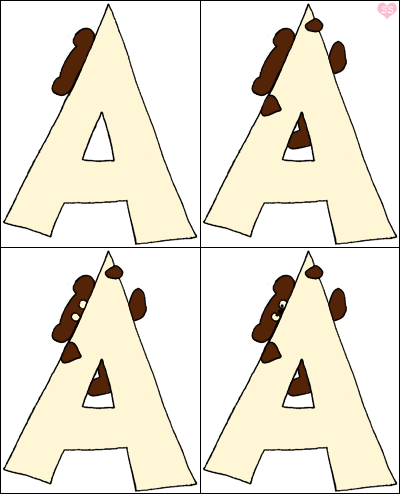
The Lorax Decoration (optional)
white, yellow, orange candy melts
semisweet chocolate
black food coloring pen


"L"

"O"
"R"
"A"
"X"
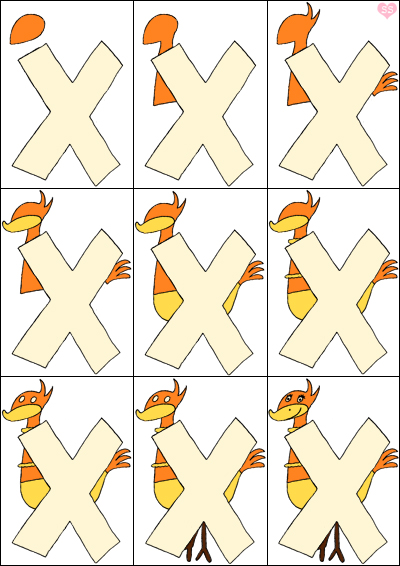

Use melted white candy melts to dot on two eyeballs. Melt semisweet chocolate and use it to draw on two legs (don't make them too thin or they will break when you try to remove the "X" later). Finally, use the food coloring marker and draw: pupils, eyelids, eyelashes, nostril, and mouth.
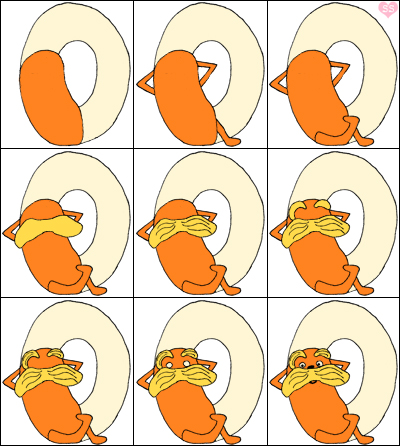
Cotton Candy Truffula Trees
pink, blue, yellow cotton candy
2 sheets white printer paper
brown marker
scotch tape
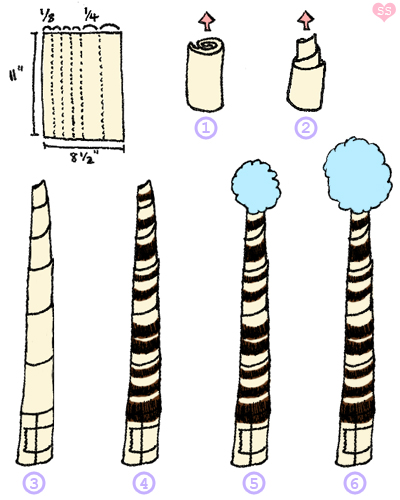

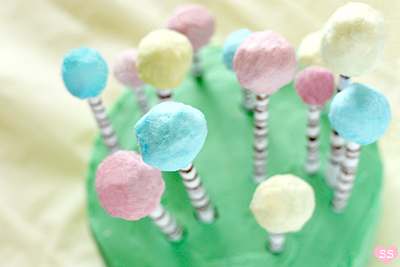
Take one paper strip and curl it up to form a tight spiral. Pull the paper edge that's in the center of spiral upwards. Keep pulling so you form a tube. Once the tube is tight, stop pulling and tape down the paper edge at the bottom of the tube to keep it from unraveling. Use the brown marker to draw random rings around the tube. Repeat with all the paper strips to form all the tree trunks. Now take a bit of cotton candy and wrap it around the top of a paper tube. Wrap more cotton candy around until satisfied with the size.
Note: I bought my cotton candy at Party City, but I've seen cotton candy being sold at stores like CVS and Walmart as well.
You are ridiculous. In the most positive, flattering way possible, because I admire every single second of love and patience you put into all your beautiful and no doubt delicious goodies. <3
ReplyDeletethis is so cute!!! i'm going to try this for a friend's birthday thanks!
ReplyDeleteThis cake is absolutely perfect! Its so cute and pretty as well. I love how you decorated the cake which matches well with the movie. I recently made a multi-coloured cake but yours is waaay better than mine.
ReplyDeleteThat cake is adorable!! I love the truffala trees :)
ReplyDeleteThis is so cute!! And delicious I bet, too.
ReplyDeleteHow super adorable! I love the layers inside.
ReplyDeleteWhat a wonderful tutorial! You make what originally looked like an impossible task for a novice look doable, and this cake just looks so darn cute :) Lovely!
ReplyDeleteso awesome! very well done :)
ReplyDeleteThis is SO cool. Your skill and creativity never fails to amaze me :-)
ReplyDeleteOhhhhhhh my God I'm hungry all of a sudden. That looks heavenly.
ReplyDeleteDo you think you would make the letters backwards, so when you put them on the cake they're smooth?
Yes, you can totally do that, just make sure that you're tracing the letters in reverse so they'll be right side up when you flip them. Once they're dry, flip them over and then add on the animals. Good idea :).
DeleteThat is SOOOO cute! Wow...what a lot of work and what a special memory for the little ones who eat it!
ReplyDeleteThis cake is so amazing and adorable, the gorgeous colours make me smile!
ReplyDeleteoh... your passion is amazing...I haven't watched it but seeing this, i'm definitely looking to it.
ReplyDeleteI am so happy to find this gorgeous post on FoodGawker! It really is amazing:-) Take care, Terra
ReplyDeleteFantastic!!!
ReplyDeleteThank you for sharing :)
very colourful cake :)
ReplyDeleteThis is absolutely fantastic and so much fun! And *thank you* for sharing a variation of the famous rainbow cake without 6 sticks of butter in the frosting!
ReplyDeleteOh my goodness! This is one of the coolest cakes I have seen in a while! you are super talented! I wish I could make something this pretty... I am so pinning this! Amazing job!
ReplyDeleteWow, I'm loving how beautiful this cake is. I know nothing about Lorax and I avoid crowded kiddy cinemas too.
ReplyDeleteI'm loving your blog too, so pretty and colourful. I'm now offically your newest subscriber!
Keep up with the amazin' bakin'!
-Lisa
Sweet 2 Eat Baking
I'm planning on using your recipe to make a rainbow cake, but it looks like there's a lot less batter in this recipe. Do you think I could bake 6 short 8-inch layers with this recipe?
ReplyDeleteYou can easily bake 6 layers. Instead of dividing the batter into 3 parts, divide it into 6 and color each layer. But they'll need to be baked for less time because they'll be half the width of the original 3 layers. Instead of 20 minutes, bake each of the 6 layers about 12-15 minutes (they're done when a toothpick comes out clean).
DeleteAnd also just a warning, the cake layers are quite thin, so make sure that line the bottom of your cake pans with parchment paper and that the edges of the layers are fully loosened from the sides of the cake pans so they don't tear when you're flipping them out from the pans.
I love this tutorial! The only thing I'd do differently is to use pirouline cookies for the tree trunks so that the entire thing becomes edible. :)
ReplyDeleteI like this idea and thought of it, but wondered if the trees would look tall enough?!
DeleteI definitely thought about using some sort of cookies for the trunk, but I wanted to stick to the movie depiction of the truffula trees which had thinner trunks. And also, when given the choice, I try to avoid ingredients that aren't necessarily widely found (pirouline cookies) and pick something that's more common (printer paper) so that more of my readers will be able to make the recipe.
DeleteBut pirouline cookies will easily work in place of the paper. Just make sure to make the cotton candy tree tops bigger than mine so that the thicker trunks are more in proportion with the tree tops.
I like the idea of an edible tree trunk. I thought of that, but wondered if it would be long enough.
ReplyDeleteTo tell you the truth, I have no idea. The last time I had pirouline cookies was a long time ago. Try it out! You'll never know if you don't try. Most likely they will (in the end my trunks weren't super long/tall).
DeleteThough that is one reason why I chose to use paper trunks at the end: I can easily control the height and width of the trunks and can have a variety of trunk sizes.
We are performing The Lorax as a Readers Theatre production in my Second grade classroom. Your creative ideas are unbelievable! Do you think this would work as a 1/4 sheet cake?
ReplyDeleteYour production sounds adorable! This cake should work as a sheet cake, but the recipe will probably need to be doubled since a 1/4 sheet cake has about 2x the area of an 8-inch round cake. And the baking time will definitely need to be adjusted, maybe 20-25 minutes per layer (if the recipe is doubled)? That's just a guess, the key is to bake it until a toothpick or knife comes out clean.
DeleteOr, as an alternative, possibly consider 2 round cakes, which ends up with about the same number of servings as the sheet cake.
The decorations on this are so precious! Nice work!!
ReplyDeleteYour tutorial is an absolutely incredible resource. Thank you!
ReplyDeleteincredible.
ReplyDelete<3 <3!!!! Beautiful job!!!
ReplyDeleteI make the Loraz aprons.. :)
Amazing! Especially the details on the animals for the characters are so helpful for those like me. Love your blog! I stumbled on your blog while googling for domo cookies, and I've been reading since yesterday. I will make the domo cookies this weekend for my son and my niece.
ReplyDeleteThis is a beautiful cake! I intend to give it a try for my son's birthday this Saturday. I am a bit concerned about the serving I will get from it. I am expecting around 70 people, more kids than adults. Could you provide an estmite about the number of servings for this cake and any suggestions on how to increase the size and/or recipe. Thank you!
ReplyDeleteThe recipe makes one 8-inch diameter round cake (about the size of the typical round cake found at supermarket bakeries). Usually that serves about 10-12 people, possibly more if you cut the slices thinner. To serve that many more people, I would suggest you make more cakes, making the recipe as many times as necessary.
DeleteThank you for your prompt response. As you can probably already tell I am not experienced baker and I appreciate your help! I think I might combine the cake with cupcakes in the different colors. Do I need to make modifications to the recipe in order for the cupcakes to come out right?
DeleteNo problem, I'm happy to help! The cupcakes sound like a good idea. You can make pink, blue, and yellow cupcakes and top each of them with a bit of green frosting and a truffula tree decoration. I don't think you need to modify that much to make cupcakes, just pour the batter into muffin tins lined with cupcake liners, filling each liner about 2/3 the way full. Then bake for somewhere between 15-30 minutes. They'll be done when none of the batter is raw anymore and when you stick a toothpick into the center of one of the cupcakes, it comes out clean.
DeleteJust wanted to let you know the cake turned out great! People loved the taste! You have inspired me and have decided to practice my baking, which I have always run away from. I have become a fan of your blog and can't wait to try other recipes. Btw,I couldn't take pictures of the sliced cake since the kids (and adults) couldn't wait to get their own piece.
DeleteOne last thing, tried it with the pirouline which the kids loved but it "looks" prettier with the paper sticks as you can really create a forest effect.
ReplyDeleteThanks for sharing. Yup, it's definitely a trade off. Either a prettier cake with paper trunks or a totally edible cake with piroulines.
DeleteBeautiful cake, really fun idea but I can't believe no one else has asked this... how do you get the cotton candy to stay on the "stick"?! I am in the midst of trying this on a smaller scale with lollipop sticks (for a party today) and after having no luck with getting the cotton candy to stay on, I made the poor decision last night to use a bit of frosting. Needless to say, my beautiful truffula trees were are shriveled up and hard in the morning. I tried adding some more to the now hardened shell because it will stick to that, but I'm watching the new fluffy layer slowly shrink as well! Argh! Please tell me there's an obvious method I'm missing because as much as I know I'll be out of luck for making the cake look the way I want it to, at least I'll know for the future. Thanks so much!
ReplyDeleteI addressed this issue in the last paragraph under the "Frosting the Cake" section, but it was brief so maybe you skipped over it. I don't know why, but bagged cotton candy tends to harden after being exposed to air for a while. I think it has to do with water vapor in the air because exposing cotton candy to liquid messes it up. I haven't tried different brands of cotton candy, maybe that will help?
DeleteBut anyway, like I mentioned above, what I did was I waited until not that long before I was going to serve the cake to make/add the truffula trees, so that the trees wouldn't shrivel up ahead of time. If you want to make the trees ahead of time, after wrapping the cotton candy around the trunks, take some plastic wrap and cover the cotton candy portion of the tree, keeping it airtight so it won't harden.
To have the the cotton candy "stick" to the trunks, what I did was pull off a strand of cotton candy and sort of tangle it around the top of the trunk to keep it from sliding off. (make sure the cotton candy you're using is fluffy, you can pull off long strands of it, rather than dense and clumpy). I think using lollipop sticks makes this task more difficult because they're thinner than paper trunks, so there's less surface area/friction to keep the cotton candy up. You'll have to use much less cotton candy or switch to the paper trunks.
this is fantastic! thank you so much! :)
ReplyDeleteThis is absolutely adorable and happens to be one of my kidlets favorite books. I look forward to seeing the movie when it's out on BluRay. Thanks for the inspiration.
ReplyDeleteThey make a cotton candy machine that uses real candy to make it...so if you used the tree sticks with it, I wonder if the cotton candy would come out more fluffy?
ReplyDeletethis is wonderful! i'm doing a school project on the movie launch of The Lorax and this is a great addition to the whole event!
ReplyDeletethank you :-)
Hi,
ReplyDeleteI love your cake and I want to try this for an upcoming birthday. Just one question. How tall was the cake? I'm wondering if I want a taller cake should I double the recipe?
Making this right now. I have never made a cake where you mix the ingredients in that order. It smells good...
ReplyDeleteThis comment has been removed by the author.
ReplyDeleteI just found this and I'm going to attempt this weekend because my daughter is turning 17 next week and she LOVES the Lorax! I'm just hoping I can get the letters off the parchment/wax paper without breaking them lol. I did get those stick cookies. We'll see if it looks good. If not, I'll make some paper trunks and just eat the cookies! :)
ReplyDeleteI thought of another option that might be a compromise between the thin-ness of the paper and the edibility (is that a word..?) of the pirouette cookies. It is a japanese cookie called Poky, and I have seen it at many grociery stores. If you are familiar with it, it is a thin, long cookie stick generally coated with a chocolate, strawberry, or white chocolate. The white chocolate ones would be perfect for this. Just use the food safe marker to make marks on the trunk.
DeleteThis has got to be the neatest, prettiest, most creative cake I have ever seen! Not only that, but I actually really enjoyed reading the directions and seeing the images that went with them. Usually baking instructions are so technical and boring, but this was interesting and fun to read through! Unfortunately, my daughter doesn't turn 4 until September and there are no other birthdays or events between now and then for me to make this for. Fortunately, I don't think anyone will mind much if I make this as a 'just because' cake. Thanks so much for sharing!!
ReplyDeleteJust made this for my nephew's birthday and everyone loved it! I changed up the cotton candy trees for cake pops and it turned out great. The instructions were super easy to follow, thank you! :)
ReplyDeleteI miss the movie.. I love watching Lorax with the kids at home. thanks for the recipe,.. I'm really going to do this.
ReplyDeleteWoaaa! The cake is so colorful~~ Look very very yummy and beautiful. I cannot do like you, absolutely, but see these cake makes me happy :3
ReplyDelete