


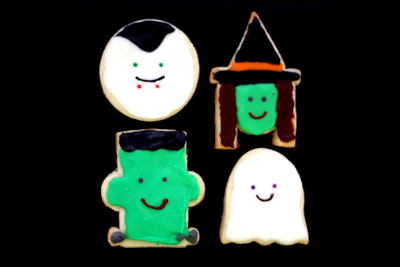
Just a warning, today's post is extremely picture heavy. But then again, who doesn't love pictures?
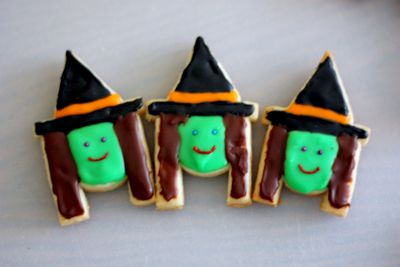
Chubby witches, skinny witches, witches of all shapes and sizes.
Smiley, happy ghosts.
Green, shiny Frankensteins. Despite some of my pictures, this icing is actually quite shiny, especially if your cookies are chilled or frozen after decorating.
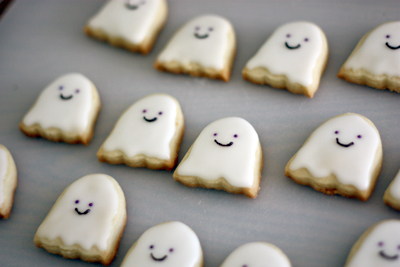
Making Ghosts
Tulip or Egg and Leaf/Umbrella Cookie CutterWhite Icing (body)
Black Icing (mouth)
Purple Sprinkles (eyes)
Sandwich Bag
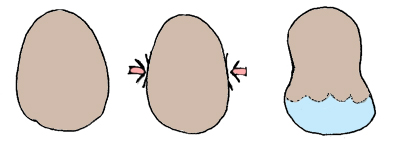
Before baking, there are many ways to cut out ghost shapes. One, if you have a tulip shaped cookie cutter, use it. Two, if not, use an egg shaped cutter and about 2/3 down from the top of each egg, use your fingers to slightly push in the sides, and then use either a leaf or umbrella shaped cutter to for the scalloped bottom. Three, if all else fails, use an oval shaped cutter to cut out cookies and then cut each of them in half, disregarding the wavy bottom edge.

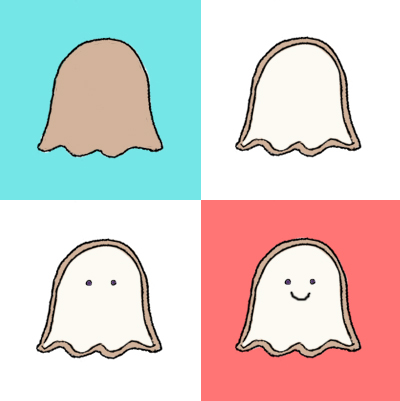
Once your cut-outs are baked and cooled, your cookies are ready for decoration. First drop some white icing onto the cut-out and with a spoon, spread it so that it follows the outline of the cookie. Next, with your fingers or tweezers, drop two purple sprinkles 2/3 the way up from the bottom of the cookie to form the eyes, making sure that they stick to the icing.
Lastly, place a small amount of black icing into the corner of a sandwich bag. Snip a small hole into the corner. Try squeezing a little out onto a test surface to see the line size. Is it too thin? Make the hole larger. Is it too thick? Scrape the icing into the other corner of the sandwich bag and cut a smaller hole this time. Then with the sandwich bag, draw a smile for each of your ghosts underneath the eyes.
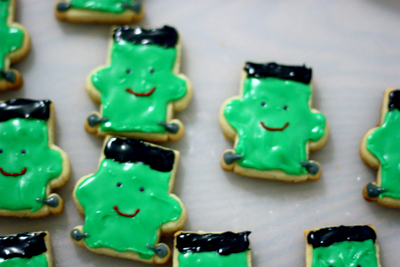
Making Frankensteins
Rectangular Cookie Cutter or Knife and RulerCar Cookie Cutter
Plastic Straw
Chopstick
Green Icing (skin)
Black Icing (hair)
Red Icing (mouth)
Gray Icing (bolts)
Purple Sprinkles (eyes)
Sandwich bag

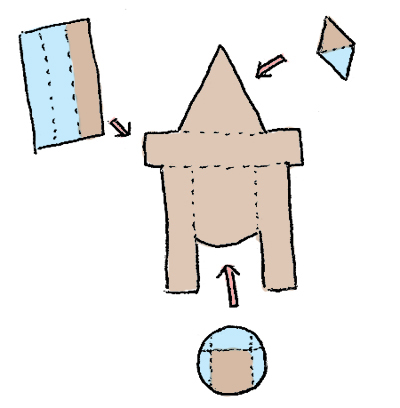
Here is how I made the Frankenstein shapes. For the general head shape, I used a rectangle cookie cutter. But if you don't have a rectangle cutter, just take a knife and straight edge and slice some rectangles into your rolled out dough. Next, for the bolts, since I didn't have such a small circle cutter, I made my own by cutting off a small portion of a plastic straw and using that to make my circles. To get the circles out of the straw, I poked into the straw with a wooden chopstick.
For each Frankenstein, I stuck one tiny circle on either side near bottom of the head. Lastly for the ears, I used the wheels of a car shaped cutter. But if you don't have a car cookie cutter, you can always cut out small circles, a bit larger than the ones for the bolts, and then split them in half so each circle makes two ears.
Once your cut-outs are baked and cooled, they are ready for icing. First, with your green icing, make the face, leaving a space at the top of the cookie for the hair and avoiding the two small circles at the bottom. Next, place two purple sprinkles a little above the center of the cookie for the eyes. Then, fill in the blank area at the top with black icing for the hair.
With your gray icing, fill in the two circles at the bottom and then with gray lines, connect them to the green icing. Lastly fill your sandwich bag with a small amount of red icing, snip a hole, test out the line size, and then trace mouths onto your Frankensteins.

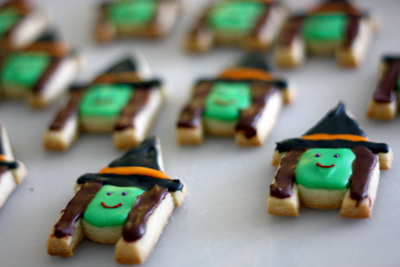
Making Witches
Circle Cookie CutterDiamond Cookie Cutter
Rectangular Cookie Cutter or Knife and Ruler
Green Icing (skin)
Brown Icing (hair)
Black Icing (hat)
Orange Icing (hat ribbon)
Red Icing (mouth)
Blue Sprinkles (eyes)
Sandwich bag

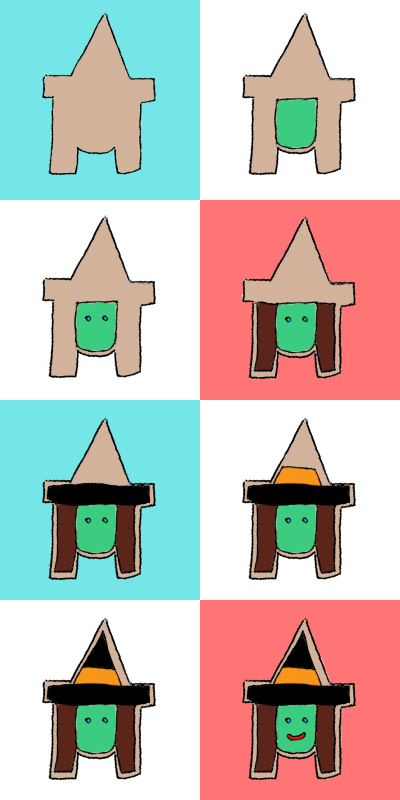
Once cookies are cool, it's time to decorate. It's okay if the lines separating the different shapes are visible, as long as the different shapes don't separate as you take them off your baking sheet. First, with your green icing, trace the area made with your circle to form the face. Then place two blue sprinkles on the green icing for the eyes, pushing down on them to make sure they stick to the icing. After, with your brown icing, fill in the two rectangles on either sides of the face.
Next with your black icing, trace the rectangle above the face and hair to form the hat brim. Then make a small line of orange above the black rectangle to make the hat ribbon. After that, with the rest of your black icing, fill in the rest of the triangle to finish the hat. Lastly, place a bit of red icing into a sandwich bag corner, snip a hole, test the line size, and then trace mouths onto the faces of your witches.
Once you are done with all your decorating, remember to make sure that all the icing is dry before stacking and storing the your cookies. Also, a late reminder, but while decorating, be sure to keep icing that isn't being used covered so that it doesn't dry out. Now, a few more pictures :)...
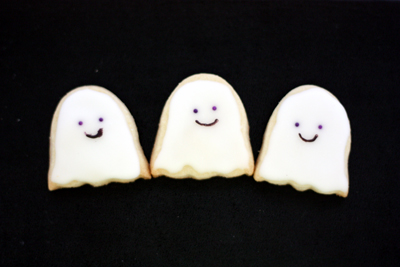
Three Friendly Ghosts, like Casper.

:D i like the step by step pictures of where the shapes came from. so cute. how big are these? I picture the entire cookie being able to fit in my mouth. tahaha
ReplyDeleteThanks :)! I don't think they're that tiny, but maybe a tight fit? Like 2 inches tall.
ReplyDeleteaHAHAHA. that's pretty big.
ReplyDeleteNice post - black hair pictures ..Keep Posting
ReplyDeleteRon
black hair pictures
Aww how adorable! I love the little Frankenstein monster! Makes me miss Halloween already!
ReplyDeletehow do i follow? :(
ReplyDeleteso cute!!
ReplyDeletei want a cooookie~
hungeryjack: Thanks!
ReplyDeleteJessica: Thanks, yeah I miss Halloween!
StephwhY: hehe, you figured it out right?
Tiff: :D. I'll make you Christmas-themed ones when you get back!
I am here via the Humble, and have to tell you, you are amazing. Those ghosts are so cute I could just die. Mine look like crap compared to yours!
ReplyDeleteI'm following. Try and stop me!
Mr. P: Yay, thanks, glad you like!
ReplyDelete