


When I think of "vampires", what comes to my mind is still the cliche depiction of the mythical figure, you know with the prominent widow's peaks and sharp, visible fangs... rather than the oh so popular Twilight vampires.
So after many trials and searches, I have finally found the perfect sugar cookie recipe! It has a nice, chewy texture and a flavor just sweet enough that a icing can still be used. Plus, all the cookie cut outs stay the same size as they bake. As for the icing, though royal icing makes gorgeous designs, I'm not too partial to how it tastes. But luckily the icing I'm about to share with you is both appealing for designs and tastes delicious!
Basic Sugar Cookies
adapted from Peggy Porschen's Pretty Party Cakes1 3/4 stick butter (200g) @ room temperature
1 cup + 2 tbsp sugar (200g)
1 egg, lightly beaten
3 cups flour (400g)
Cream the butter with the sugar. Beat in the egg until combined. Add the flour and mix until all the flour is incorporated. Wrap the ball of dough in plastic wrap and refrigerate for at least one hour.
Once chilled, take out the dough and knead slightly. Roll out dough to a 1/4 inch thickness. I take a fourth of the dough and place it between 2 large sheets of plastic wrap. To ensure an even thickness, I place two 1/4 inch thick magazines on either side of the dough lump (above the top sheet of plastic wrap) and then roll my pin over the dough and the magazines. Then use cookie cutters to cut out shapes and with a spatula or some sort of knife, loosen the cut outs from the plastic wrap and place onto baking trays lined with parchment paper.
Try to place similar sized cookies on the same trays to ensure even browning in the oven. Once the tray is filled, place the entire sheet of cookies into the refrigerator for another 30 minutes. Preheat the oven to 350°F. Once the cookies are chilled, bake them for 8-12 minutes until their edges begin to turn golden brown. Cool the cookies on a wire rack.
*Edited 12/16/09 with English measurements
Sugar Cookie Icing
adapted from JBS BOX @ allrecipes.com1 cup powdered sugar
2 teaspoons milk
2 teaspoons light corn syrup
assorted food coloring
1/4 teaspoon almond extract
NOTE: Other extract flavors can be used in place of almond extract if desired, i.e. orange, mint, lemon...
Mix the powdered sugar and milk until no longer lumpy. Add the corn syrup and extract and beat until smooth. If the icing is too thick, beat in some more corn syrup until desired consistency (not too thick that it can't be spread, but not too thin that it flows over the sides of the cookie).
Separate the white icing into different bowls and add the different food colors to each bowl. Be sure to keep the other bowls covered when not in use or else the icing will begin to dry out.
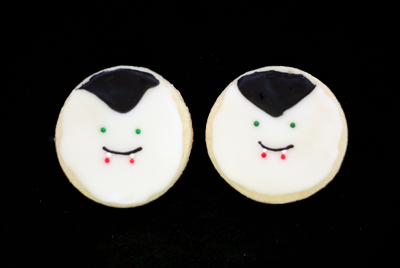
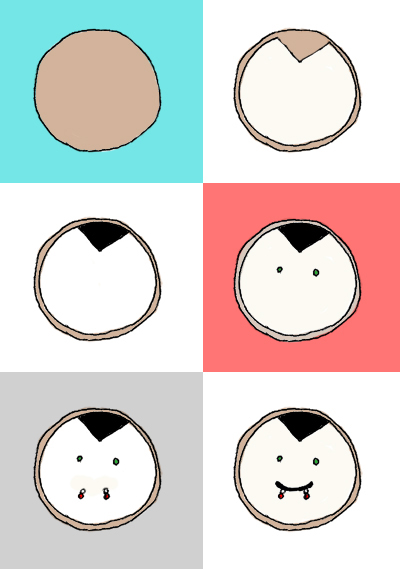
Making Vampires
Circle cookie cutterWhite Icing (Skin)
Black Icing (Widow's Peak + Mouth)
Green Sprinkles (Eyes)
White Sprinkles (Fangs)
Red Sprinkles (Blood)
Sandwich bag
Before baking, use a circle cookie cutter to cut out your vampires. After your cookies are baked and cool, you are ready to decorate. Start with your white icing. Drop some of the white icing onto your cookie and with your spoon, spread the icing so that it follows the circle, except leave a wedge of empty space for the widow's peak. Repeat with your other cookies.
Next, drop a small amount of black icing into that empty wedge and carefully spread it out to cover the entire wedge. Repeat. Then, with your fingers or clean tweezers, grab your green sprinkles and plop them an equal distance apart a little more than halfway up your cookie (I contemplated having red eyes, but I though green eyes would be cuter, haha), pushing them into the icing so they stick. Then add two white sprinkles for the tops of the fangs and underneath, red sprinkles for the bloody, bottom halves of the fangs.
Finally, the smile. Place a small bit of black icing into the corner of a sandwich bag. Cut a very small hole into that corner with scissors. Try squeezing some out onto a plate or another test surface to see if the thickness of the line is what you desire. Then carefully trace a smile, connecting the two white sprinkles together. You're done! Now make sure the icing is totally dry before stacking the cookies together.
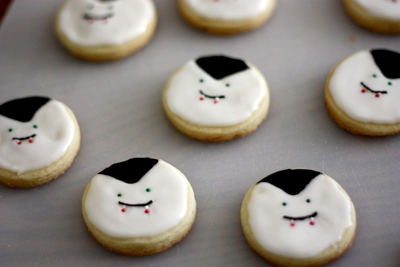
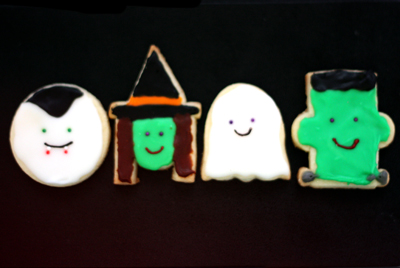
Here's a sneak peak of the monsters in next time's posts :D...
i want to EAT these scary-yummies!
ReplyDeletehaha, the icing's the one from the snowflake cookies last Christmas (the almond-y one), but the cookie recipe's different, instead of being poofy, it's flat and chewy. maybe I'll make a wintery version for my Christmas cookie set this year.
ReplyDeleteOh my gosh. That is the cutest vampire ever. My daughter would go just crazy over these. She was a vampire for Halloween! Very creative...great job.
ReplyDeleteToo cute!
ReplyDeleteoneordinaryday: Thank you :). Haha, yeah it seems that vampires are quite trendy nowadays.
ReplyDeletejustJENN: Thanks!
Approximately how much is 1 stick of butter in cups? I can't buy sticks of butter where I am.
ReplyDeleteAnonymous: 1 stick of butter = 1/2 cup of butter
ReplyDeleteWow, great job here. Awesome picture too! You should really consider submitting this to Recipe4Living's Ghoulishly Good Halloween Recipe Contest! It looks delicious!
ReplyDeleteThe picture of all the vampires on the cookie sheet is absolutely adorable. :D
ReplyDeleteKey Lime: Haha, thanks. It was quite cool to see all of them together, each one with a slightly different expression on it's face.
ReplyDeleteI really want to use this sugar cookie recipe this Christmas since most of the recipes I've tried never keeps its shape in the oven :(
ReplyDelete! I was just wondering if the butter used for this recipe is salted or unsalted? thanks! :)
Ashlyn: Either salted or unsalted butter can be used, depends on what you prefer and what you have on hand. I usually use salted butter for all my baking. I love this recipe because the cookies always keep their shape!
ReplyDeleteAww, these vampires look like something my friend would draw. She is a master of the cute AND the realistic.
ReplyDeleteI totally fell in Love with your creations <33 I can't stop going through your posts, they are all soooo adorable! Incredible! I am glad that I found your blog ^^
ReplyDeleteabout how many cookies can you get out of your sugar cookie dough recipe? say 3" cookies. just trying to figure out for holiday baking purposes. also, I love all the decorated cookies you make, you've inspired me!
ReplyDeleteSorry for the late reply! I'm not totally sure, but I'm guessing about 20 3-inch cookies.
DeleteDo you know how quickly the icing hardens and if these cookies can be stacked to transport? Also, do you know if they can be baked and iced in advance and frozen???
ReplyDeleteThanks,
Jennifer
In my experience, the icing totally sets within 1-2 hours. The cookies can definitely be stacked after the icing is hardened through. These sugar cookies (undecorated) can be baked in advanced, and once cooled, they can be frozen in an airtight container. When ready to decorate, remove them from the freezer and let them defrost/return to room temperature before decorating.
DeleteAs for decorated cookies, the best option I can think of is icing the vampires in advance without the mouth and freezing them. Then, on the day you want to serve them, remove them from the freezer, let them defrost, and add on the mouth. The thing is, if there are multiple layers of icing, the coloring of the top layers tend to bleed once the cookie is defrosted.
The best option is to freeze undecorated cookies in advance and decorate later, but if it's really necessary to decorate in advance and freeze, add on the mouth later.
I am having trouble with the dough. It is crumbly and, at least while it is cold, impossible to flatten, with a rolling pin or otherwise. I even added a little less flour because it seemed dry. Advice?
ReplyDeleteThank you!
Marsha
My granddaughter, Sophia and I used the idea for your Santa cookies, (which I saw on Pinterest) as her entry in our annual Christmas Dessert Contest. She is only 6 years old and enjoyed the whole process. Thank you for the inspiration!
ReplyDelete