


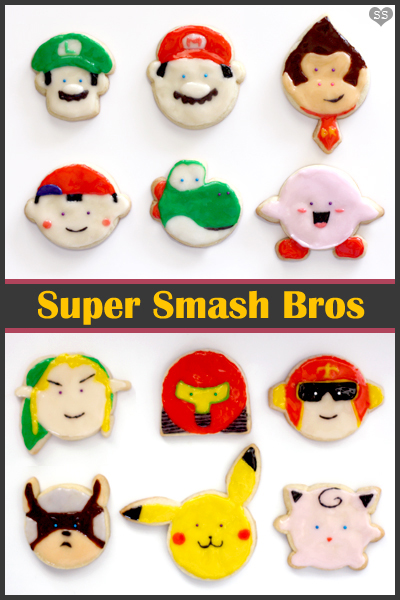
Continuing from the last post on Controller Cookies, with my mind geared toward video game baking, I forged on and made Super Smash sugar cookies in the shape of all the characters from the original N64 version of the game, modifying the characters to fit my cookie style. I considered making cookies for the newer versions of the game, SSB Melee and Brawl, just because there are so many more characters to choose from, but I find my heart still lies with the original. Making these cookies definitely had me reminiscing of those halcyon afternoons spent hanging out friends, playing this very game.

Super Smash Bros Cookies
sugar cookie doughsugar cookie icing
food coloring
1-inch circle cookie cutter
knife
pearl milk tea straw
nonpareil sprinkles
toothpicks

This time there were way too many characters for me to draw out my usual how to decorate step-by-step pictures. Instead, here for each character, I have a pre-baking illustration that shows how the dough should be cut and pieced together to make the cookie's shape and a post-baking illustration of the fully iced cookie. Under the titles, I have a list of the order the characters should be iced and decorated (assume that you wait for that layer of icing to dry before moving on the the next step in the list). Let me know if you need any clarifications!
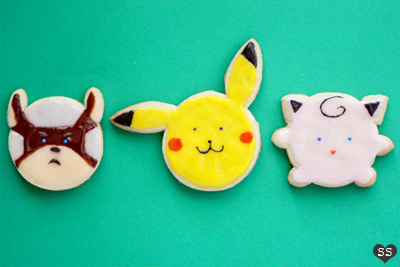
Jigglypuff
1) Pink all over
2) Black ears + Swirl
3) Blue sprinkle eyes
4) Red mouth

1) Black ear marks
2) Yellow everywhere else
3) Purple sprinkle eyes
4) Black nose + Mouth lines
5) Red cheeks

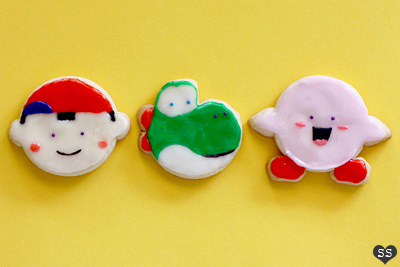
1) Pink body + Arms
2) Red Shoes
3) Purple sprinkle eyes
4) Black portion of mouth
5) Pink tongue + Cheeks

1) Red hat
2) Black hair + Sideburns
3) Peach face
4) Blue hat brim
5) Purple sprinkle eyes
6) Black smile
7) Pink cheeks

1) Green hat brim
2) Black sideburns
3) Peach face + Ears
4) Green hat (leave empty circle in middle)
5) Fill in circle with white
6) Peach nose
7) Moustache
8) Blue sprinkle eyes
9) Green "L" on white circle

1) Red hat brim
2) Black sideburns
3) Peach face + Ears
4) Red hat (leave empty circle in middle)
5) Fill in circle with white
6) Peach nose
7) Moustache
8) Blue sprinkle eyes
9) Red "M" on white circle

1) Green through middle
2) White above and below green
3) Green outline above eye white
4) Red spikes
5) Blue sprinkle eyes
6) Purple sprinkle nostrils
7) Black smile

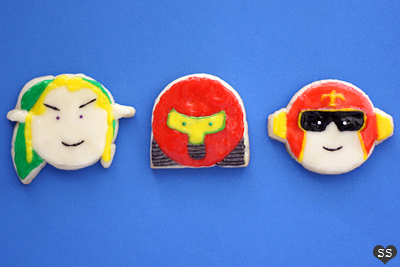
1) Yellow eyepiece
2) Green eyepiece ourline
3) Red "circle" (leaving portions for gray empty)
4) Fill in empty portions with gray
5) Green sprinkle eyes
6) Black lines on gray

1) Black eyepiece
2) Peach face
3) Yellow outline + Eagle
4) Red mask
5) Yellow "ears"
6) White sprinkle eyes
7) Black smile

1) Peach face + Ear bottoms
2) Brown middle face outline
3) Gray mask parts
4) Blue sprinkle eyes
5) Black eyebrows + Nose + Mouth

1) Peach face
2) Brown head point
3) Red tie
4) Purple sprinkle eyes
5) Pink sprinkle nostrils
6) Black smile
7) Yellow "DK" on tie

1) Yellow hair
2) Peach face + Ears
3) Green hat
4) Purple sprinkle eyes
5) Black eyebrows + Mouth

haha these are so cute!! :D kirby! <3
ReplyDeleteThis post is just jam-packed with cuteness. The cookies are adorable. The tutorial drawings are adorable. You're killing me here.
ReplyDeleteI have always wanted my own pet Yoshi.
Adorable! I really shouldn't show my boyfriend this post because he'll demand some of his own, but I can't help it! I have to run down the hall right now, screaming "LOOK AT THESE!!"
ReplyDeleteI love your creativity with food! Might give your cookie recipes a go during my winter break. ^^
ReplyDeleteSteph: Thanks! Haha, Kirby is cute :).
ReplyDeleteAli: Thank you. Yoshi is pretty awesome; a pet Yoshi would be cool!
Danae: Haha, that's hilarious. People who like video games definitely seem to like these cookies.
yuns: Thank you. Ooh, I hope you do try them out :D.
This is precious! I wish I would have read your post sooner so that I could make it for my nephew's birthday. He is obsessed with Super Mario.
ReplyDeleteTrissa: Thanks! Aww, I wish you did too.
ReplyDeleteWow, these are so cute! I'm definitely going to make them for my friends. <3
ReplyDeleteOne question though: I'm a complete novice when it comes to baking, and I may have missed you saying it somewhere else, but how do you get the icing on so smoothly?
Is it just the icing use, or do you have a specific method?
Altara: Yay, I hope you try them out. About the icing, the icing recipe that I've been using goes on pretty smoothly, but when you first try it out, I suggest that you practice first on a few extra cookies, just to figure out what's the best consistency for the icing. If it's too liquidy and spreads too much, just add more powdered sugar. If it's too stiff, add more corn syrup or milk. But definitely let me know if you need any clarifications or have any questions.
ReplyDeleteWHY ARE YOU SO AWESOME
ReplyDeleteAnonymous: Haha, thank you! I wish I knew, j/k :P.
ReplyDeleteI WANT THEM ALL <3
ReplyDeleteMike: Haha :P.
ReplyDeleteHello! I've been a lurker on your blog for a little while now, and I have to say that you are a very talented person. That, and you cover basically all my interests with what you bake. (now all you need are naruto cookies :) ). Anyways, my question is do you use a certain tool to put the frosting on these cookies? The colors are so cleanly divided and I'm trying to figure out how I could make them like this without creating a disaster...
ReplyDeleteAnonymous: Thank you! I just use spoons and toothpicks to frost my cookies. Two key points to getting nicely frosted cookies are: 1) your icing has to be at the right consistency so that it doesn't have little peaks (this will take practice to figure out what is "right") and 2) make sure to wait for each color to dry before adding another color of icing so that they don't mix.
ReplyDeleteI'm thinking about doing a sugar cookie tutorial as part of my planned Baking 101 Series, so look forward to that sometime in June or July :).
How awesome! Almost too good to eat :)
ReplyDelete