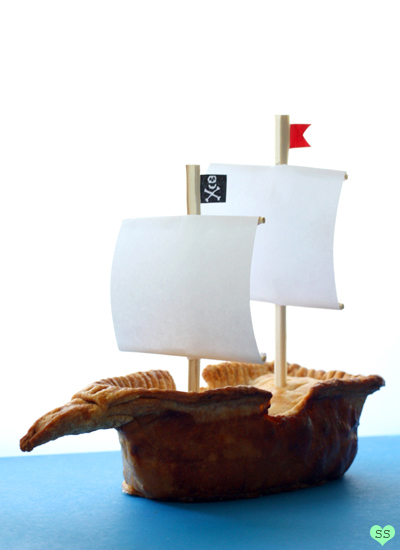
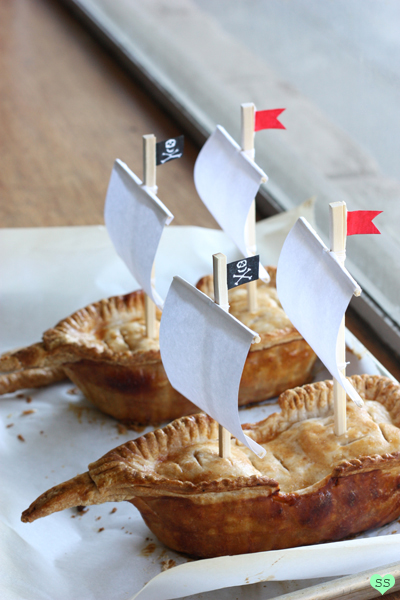
...Which finally gets me to the point of my post: an APPLE PIE-rate ship (yes, I love puns). As I was trying to decide on what to bake for Ms. Humble's Not So Humble Pie Contest, I thought about how I always see interestingly shaped cakes out there, but rarely do I see pies that look like anything but pies. (By the way, the pie above was not burnt, just weird lighting when I took the picture :P).
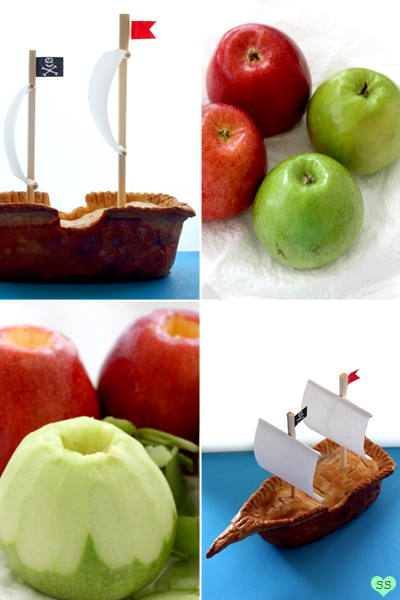
Thus, I decided that I'd bake a pie that wasn't the typical circular pie. Apple Pie...Pie... 3.1415... Pi... Pirate! I would make a pirate ship shaped apple pie. I went to the store to search for an appropriate baking vessel for my plan and settled on a pair of mini loaf pans. I modified my pans with a bit of foil and I baked my pies. After the pies cooled, I had a little arts and crafts moment as I constructed the sails out of chopsticks, bamboo skewers, and a piece of paper. Once the masts were inserted, my pirate ship pies were complete.
APPLE PIE-rate ship
adapted from cookinglight.com2 1/2 cups flour
1/2 tsp salt
1/2 cup shortening
1/2 cup ice water
nonstick spray
4 apples (I used granny smith and braeburn)
6 tbsp sugar
3/4 tbsp flour
1/2 tsp cinnamon
1/4 tsp salt
a pinch of nutmeg
1 egg
pie weights, dried beans, or dried rice
coffee filters or parchment paper
2 aluminum mini loaf pans (5 x 2.5 inches)
2 pairs of disposable chopsticks
3 bamboo skewers
foil
tape
black and red marker
glue gun
In a bowl, combine the flour and salt, and mix. Cut the shortening into small pieces and add them into the bowl. Use a pastry cutter or a fork to incorporate the shortening until there are pea sized lumps. Add the ice water one tablespoon at a time, gently mixing it in, letting it moisten the dough. Gather the dough into a ball and split it in two. Place each half on a piece of plastic wrap. Flatten each into a disc, fold over the plastic wrap, and chill in the fridge for 30 minutes.
While waiting, prepare the apples. Peel and core the apples. Thinly slice them and then chop the slices into thirds. Place the apples pieces in a mixing bowl. Add the sugar, salt, flour, cinnamon, and nutmeg. Gently mix. Cover the mixture with plastic wrap until ready to use.
Preparing the Pans
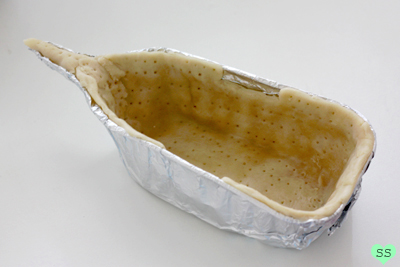
For the two mini loaf pans, grab the center of one of the smaller sides and pull it out so it makes a point. so now instead of rectangles, the pans have 3 of the original sides and a little pointy side. Take a large piece of foil and wrap it around one of the pans, using it to extend the short pointy side to make a longer point. Fold the excess foil over the other pan edges. Spray both pans with nonstick spray.
Preheat the oven to 425°F. Take one disc of dough and place it between two large pieces of plastic wrap. Roll it out to a 12x10 inch rectangle. Peel off a piece of plastic wrap and cut the dough rectangle into two pieces, one that's 9x10 inches and another that's 3x10 inches (refrigerate the 3x10 inch piece).
Shaping the Crusts
Bottom Crust
Take the 9x10 inch rectangle and place it into the prepared mini loaf pan and stretch it to fit the mold. Trim the overhanging dough with kitchen shears. (If desired, in the center of the longer edges, a little notch of dough can be cut off for aesthetic purposes, to make the ship more "ship-like" in appearance). Repeat all of this with the other disc of dough and mini loaf pan. Take a fork and poke holes all over the doughs to prevent bumps forming in the crust when baking.
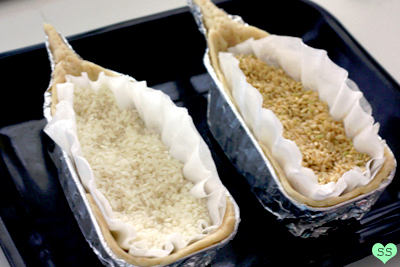
Spray two coffee filters with nonstick spray and place them on the dough in the pans (or two pieces of parchment paper can be used instead); this keeps the pie weights from touching the dough and will make it easier to take them out. Fill the pans with the pie weights or dried beans or dried rice. Place the two filled pans on a baking sheet and then place the sheet in the oven for 15 minutes. When done, take the sheet out of the oven and let the crusts cool.
Top Crust
Once cool, take the apple filling and spoon it into the two crusts, filling to about 1/4 inch from the top of the crust. Take the 3x10 inch pieces of pie dough out from the fridge and place them onto the crusts. Seal the dough by pinching around the top 1/4 inch of the crust. Trim the excess overhanging dough. Then take a fork and press it around the crust edge to make sure that it's firmly sealed. Take a knife and cut slits in the dough for vent holes. Mix the egg with 1 teaspoon of water to create an egg wash and brush the tops of the pies. Then place them in the oven on the baking sheet for 10 minutes.
After 10 minutes, lower the oven temperature to 350°F and continue baking for 35 minutes. If the pointy part of the "ship" or the edges start to brown too much, rip off small pieces of foil and cover them. Once done, take the pies out of the oven to let them cool. When completely cool, carefully remove the pies from the aluminum pans.
Preheat the oven to 425°F. Cover a baking sheet with parchment paper and place the pies on the sheet. Take the rest of the egg wash and brush the pie sides with it. Cover the top of the pies and the pointy part of the "ships" with foil. Bake the pies for 15 minutes. Check and see if the sides are dry and golden brown. If so, take the pies out of the oven and let cool. If not, continue baking them until the sides are dry and golden brown. Then remove from the oven and let cool.
Adding the Sails
Take a bamboo skewer and poke two holes in the pie: one hole 1/3 from the one end of the pie and the other hole from the other end of the pie. Enlarge the holes with the skewer so they're big enough to fit the chopsticks.
To make the masts, split the chopstick pairs. Carefully break two chopsticks so that they are 7 inches long and the other two so that they are 6 inches long, and cut off any loose splinters. Carefully cut the skewers so you have eight 3 inch pieces. Hot glue one bamboo skewer piece 1 inch from the top of the chopstick and glue the other piece 3 inches from the top of the chopstick, both skewer pieces should be perpendicular to the chopstick.
For the sails, cut out 3x3 inch squares from the piece of white paper. Fold a little bit at the top and the bottom of each square. Cut out a little notch in the center of the parts that were just folded. Now take the four sails and attach them to the bamboo skewers by wrapping the top and bottom folded parts around the skewers and taping them down, with the chopstick fitting into the notches that were cut.
For the flags, cut out four 3/4x1/2 inch rectangles from the piece of white paper. Fold a little tab on one of the shorter sides of each rectangle (this will make it easier to tape the flags on the chopstick later). On two of them, draw skull and crossbones and color them black. Color the other two red and cut out a triangle from one of the shorter sides. Tape the flags to the tops of the chopsticks by taping the folded tabs to chopstick. Now stick the finished masts into the pies.
Makes 2 pie ships.






Soooo clever, and cute!!! Love it!
ReplyDeleteamazing idea sus! :) looks delicious and fun at the same time. haha, I tried to make small cheesecake bits (size of cupcakes), but they kinda failed. The crust part didn't stick together and the rims were burnt. ;( cheesecake help? heh
ReplyDeletei love this!! what a fun idea
ReplyDeleteFabulous and so creative. Love it!
ReplyDeleteBlimey! I can't believe me deadlights, matey! Now there's a deck I wouldn't mind swabbing.
ReplyDeleteSue: Hehe, thanks.
ReplyDeleteMel: Hmm, I'll contact you about the cheesecake. Have to check out the recipe first.
Baa Baa Cupcake: Thank you. Haha, cute screenname.
Lora: Thanks!
Ali: Haha, thank you :D. Love the pirate talk.
How cute and innovative!
ReplyDeletePlease participate in my giveaway at http://atasteofkoko.blogspot.com/2010/05/men-can-cook-feat-classic-spaghetti.html
Brilliant! Well done and so clever!
ReplyDeletePam
You are brilliant as always! :)
ReplyDeleteThis is pretty amazing, I feel like I could make this for my husbands birthday soon... ADORABLE!
ReplyDeletecheck out my new blog! www.recipepaiges.com!
Jane: Thanks, I'll check it out!
ReplyDeletePam: Thank you :D.
Tammy: Haha, thanks.
Paige: That would be cute. I'll definitely check it out; I'm loving the pun in the title!
PIE-rate... haha, Brilliant!
ReplyDeleteHoly brilliance! Wow! I posted a link on my column (ediblecrafts.craftgossip.com). Did I already say wow? Wow.
ReplyDeleteinsanely fantastic! Seriously! Totally have to post this with a pirate inspiration board! kudos!
ReplyDeletehugs! Kim @ http://frostmeblog.blogspot.com
party inspiration
This is awesome! I am going to post this on my blog http://uniqueunusualandinterestingart.blogspot.com/ this week and I am now following your blog as you have lots of cool creations. (I found you via Craft Gossip).
ReplyDeleteYou should let us know when the voting starts so we can go over and vote for you.
Chris: I know, aren't puns great? (I'll have to incorporate more in future projects :D).
ReplyDeleteChic Cookies: Ooh, I always love the things you post on your column. Thanks!
Kim: Thank you. I just checked out your site, and themes! I love themes. So cool.
Kathryn: Haha, thanks for telling me. That's sweet of you, the voting, but Ms. Humble's the one who makes the decision. Thanks for the sentiment anyways!
Oh no way! This is so, SO cool! I have to make this for my pirate and apple pie loving husband. I love it! I just clicked over from Craft Gossip. Your blag is fabulous. I would love to link to this if you didn't mind.
ReplyDeleteWow!!! What a wonderful idea!!!!
ReplyDeleteYou are a genius!
*sharp intake of breath*
ReplyDeleteWow!! This is amazing, love <3
Rachel: Go ahead and link it. Thank you for asking. I hope you try it out as well!
ReplyDeleteMika: Thanks :).
Beccy: Haha, thank you.
THis is a fabulous idea for my son's birthday. He cant eat any food with food colouring on it (hence, he cant have normal birthday cake), but since he is into construction right now, I could make just mountains of "dirt" apple pie and have apple crumble on top for the backhoes and exccavators. Thanks so much for the idea.
ReplyDeleteAny comments from other readers would be greatly appreciated. :)
This is so cute. I really love this especially since pie is my favourite and I'm a maritime archaeologist, so shipwrecks are my thing. I will have to make this sometime! Thanks!
ReplyDeleteLove it! Sooooo cute and looks tasty too. Nice step-by-step drawings!
ReplyDeletestarwars: That sounds pretty cute! If you did want to make a food coloring free cake, you could use little construction truck toys & paper signs to decorate a vanilla cake with chocolate or uncolored frosting (+ chocolate cookie or graham cracker crumbs), here are some cute ones from google images: cake 1, cake 2, cake 3, cake 4, cake 5, cake 6. The ideas could probably be used for pie as well!
ReplyDeleteNadine: Thanks. Your job sounds pretty interesting! I hope you try it out.
Anna: Thank you :).
This is so cool! My friend and I are gonna try it for our friend's birthday (she LOVES pirate lore). :D
ReplyDeleteI'll keep you updated as to how it goes! :)
so cute! saw this on Not So Humble Pie and read through some of your old posts. adorable stuff! :)
ReplyDeleteNancy: Yay, I want to know how it turns out :).
ReplyDeleteKeri: Thanks!
Yarr! That is the coolest pie I have ever seen! I'm gonna have to try these sometime.
ReplyDeleteAmazing! Just when you think you've seen it all... and as we all know; pie beats cake any day!! Fabulous.
ReplyDeletewow, amazing tutorial and photos! I'm going to link to this on my blog linking party so I can share it with the readers next week if that' okay. And would love it if you'd drop by and link to something else! All the best!
ReplyDeleteI love this idea of yours. The pie is MAGNIFICENT! :) Petra
ReplyDeleteHi Susan, I emailed you about using one of your photos of this pie to endorse your blog on another website, but I'm not sure if your email address worked. Could you let me know? I love this recipe and will definitely give you credit for the picture!
ReplyDeleteSarah
Jeannette: Thanks!
ReplyDeleteBethany: Haha, the battle of pie and cake :P.
Sara: Sorry for taking forever to reply, but definitely feel free to link to this!
Petra: Hehe, thanks.
Sarah: Sorry! I haven't been checking my e-mail lately. I'll go check now and let you know, thanks for telling me!
Greatest pie ever!!
ReplyDeleteWow, this definitely tops all the pies that I've seen, I love the cartoon drawings as well, haha, nice touch.
ReplyDeleteHungry Jenny x
Heather: Haha, thanks!
ReplyDeleteHungry Jenny: Thank you. I'm glad you like both the pie and the drawings.
Wow! So creative! What an awesome idea!
ReplyDeleteThat is so clever!
ReplyDeleteMy nephew would absolutely love this.
This is made of WIN!!!
ReplyDeleteAnd it's an apple pie! And a pirate ship! And doesn't require a $100 pie pan from WIlliam Sonoma or something!
You deserve the Nobel Pie-ze.
This. Is. AMAZING! How did I not find out about this sooner?!? It would have been perfect a month ago for International Talk Like A Pirate Day! Alas, my matey, I will make it next yeaaaarrrrr. Yo Ho!
ReplyDeleteThis is seriously awesome! I'm definitely going to have to try this sometime!
ReplyDeleteI found this cute idea the other day - you may like it :)
ReplyDeletehttp://www.etsy.com/listing/58523796/apple-pie-pops?ref=sr_gallery_29&ga_search_query=apple+pie&ga_search_type=handmade&ga_page=3&order=&includes[0]=tags&includes[1]=title
sea salt around the sides will give it good contrast of sweet and salty, and will play well with your sea boat themed apple pie
ReplyDeleteStef & Brilynn: Thanks!
ReplyDeleteQueenoftheFall: Haha, cute pun :P. I definitely try to avoid expensive pans because most of them are pretty unifunctional and just not worth the money.
Brie & Amy: Thanks! Totally try it out.
Anonymous 1: Thanks for sharing. They are quite cute.
Anonymous 2: I like the idea of sea salt! Sweet & salty, plus it totally fits the pirate theme :).
Susan, you're absolutely killin' me with this (in a good way). You are very creative and have the talent to achieve the results! WOW! I'm really impressed with your blog and your creations. I would LOVE to have you share this post as a guest blogger at Rook No. 17. I can see this project translating beautifully for Thanksgiving, and I would love to feature it. Let me know if you're interested. Best, Jenn/Rook No. 17 (hsh@earthlink.net)
ReplyDeletehello! this is an amazing idea! i want to make a cheesecake version of this for my boyfriend (he loves cheesecake and pirates haha) but his birthday is 10/29 so i don't have much time. my first attempt was okay, but the graham cracker shell separated and kind of broke apart during baking :( do you have any suggestions? please help!!
ReplyDeletethanks!
-lauren
lnflamm@gawab.com
Jenn Erickson: Thank you! Unfortunately, I don't have the time right now to do guest blog posts. But, you can feel free to post about my post as long as you link back to my original post and give me credit for the photos you use.
ReplyDeleteLauren: That sounds quite interesting. A few suggestions. Maybe line your pan with parchment paper or sprayed foil with a bit sticking out from the pan edge, so that once done baking, you can easily lift the cheesecake out of the pan. If not, make sure the pan is well oiled so the crust won't stick. The crust should be firmly packed and not too dry. Did you prebake the crust? Prebaked crusts tend to not fall apart as easily. Maybe if the shell pieces that cracked off were large enough, they can be glued back on with chocolate? If worst comes to worst, try using a pie crust instead of a graham cracker crust. Hope that helps!
i did pre-bake the crust, but i think i may have left it in a bit too long. i also think the crust needs to be much much thicker! haha. i might try the parchment paper idea, because i had a very difficult time getting it out of the pan. thank you so much for your suggestions!
ReplyDelete-lauren
hello! i just wanted to update you on my pirate ship cheesecake endeavor. here it is!
ReplyDeletehttp://oi55.tinypic.com/23j0nky.jpg
thank you so much for your wonderful idea and your suggestions. it turned out great (after a few tries haha) and really made my boyfriend's birthday special :)
-lauren
Lauren: Ooh, thanks for sharing! I'm glad it worked out! I love it when people let me know how their attempts went. It looks awesome and delicious; now I'm totally craving cheesecake. You're welcome :).
ReplyDeleteMy son is having a pirate party for his birthday. Even though we already have a pirate cake, I'm going to make these too! What a fun idea.
ReplyDeleteSo incredibly cute!! I hear 2011 is the year of the pie... you are certainly leading the way for a yummy fun adventure into the next big dessert craze! Thanks for the inspiration!! xo, Amy {www.thesugarfairy.com / www.facebook.com/thesugarfairy}
ReplyDeleteI recently came across your blog and have been reading along. I thought I would leave my first comment. I don't know what to say except that I have enjoyed reading. Really a nice post here!
ReplyDeletehome and garden design
Anonymous: Totally late reply, but a pirate themed birthday party sounds fun!
ReplyDeleteAmy: Thanks! Haha, yes I heard that too, the eyar of the pie prediction. I can't wait to see what new pie innovations will be made this year :).
Jazzie Casas: Thanks!
Thank you for this fantastic idea!
ReplyDeleteI don't know where should I start eating it or should I even eat it in the first place, since it looks totally artistic and delicious.... or should I say, "Delitistic"? On other note, even though making this kind of pie is a laborious process, but in the end, the fun it brings to whoever eats it is totally worth it.
ReplyDeleteThe Pierateers: You're welcome :)!
ReplyDeleteEd Hochhalter: Haha, "Delitistic" :P. I totally agree though. A little more effort can make everyday food into something fun and fresh. The work that goes into making the food is worth it just to see the enjoyment of whoever eats it (lucky for me though, I also enjoy the "labor" portion of the process, so it's a win-win).
this is the GREATEST pie in the whole wide world!
ReplyDeleteThank you for posting, will definitely give it a go :D
You have a lovely blog, big fan. Good work!
These are SO FUN! I can't believe I have not seen them before!
ReplyDeleteVivid: Haha, thanks. I hope you do try it out.
ReplyDeleteLorie: Thanks! It is definitely a fun pie.
Wow...this is fantastic! Found your site today on Be Different Act Normal. We posted some piggy pot pies yesterday and had lots of fun making them. Wish I would have known about this when my son had his pirate party. You did a great job!!
ReplyDeleteThis has got to be the most creative pie I have ever seen, and I love that it looks so difficult, but turns out to be fairly simple to make!
ReplyDeleteWould love to share this on my blog if that's O.k?
These are adorable! I am a happy new follower (via be different act normal). Looking forward to more from you.
ReplyDeleteBest,
Krysten
http://clickableparty.blogspot.com/
love this!!!! I want to have a pirate themed party now - but am not sure if I can do that since i only have a daughter...
ReplyDeleteJill: Thanks! Piggy pot pies sound adorable.
ReplyDeleteAndrea: That was my intention :), a pie that looks different from the typical pie but isn't too difficult to make. Sorry for such a late reply, but feel free to share this on your blog (just be sure to link back and give credit for any pictures you use).
Krysten: Welcome to the blog!
Jen: Thank you. Girls can be pirates too :P!
This is so fabulous! LOVE!
ReplyDeleteI know this post is old, but it was so cute I cross-posted on my pie blog: http://pienight.wordpress.com/
ReplyDeleteHi there, Susan...
ReplyDeleteMy name is Jess, and I manage all things social media for the brand Pillsbury. Each week, I feature a slew of blogger-created recipes - and our fans love them! Whenever I feature content from a blogger, I link back to the blog page + grab an image and tag bloggers on each platform.
While your Pie-rate Ships use a homemade pie crust, I think someone could use our pre-made one fairly easily. I would absolutely love to feature this on Facebook + Twitter + Pinterest some time soon, if you're game. (This seems to be the only way I can contact you on your blog.)
Let me know if this is something that interests you!
Cheers,
Jess
jess.wangsness@genmills.com