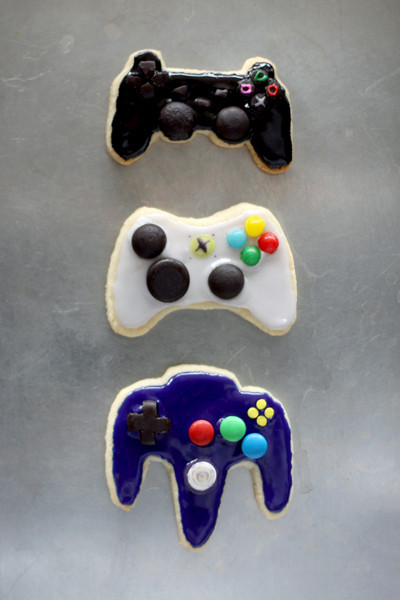
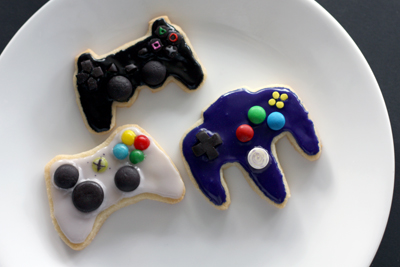
I knew that a variety of consoles would be at each party, so I ended up making three types of controller cookies: Xbox 360, Nintendo 64, and Playstation 2. It was fun going to the store to pick out candies for making the controller buttons. My most successful find was Crows, a black licorice version of Dots, perfect for simulating all those black and gray rubber buttons on the controllers. Other decorations I used were: Good & Fruity, the fruit version of Good & Plenty, mini M&Ms, white chocolate chips, and mini rainbow circle sprinkles.
Overall, these cookies were well received. They were the perfect dessert to end a potluck and segue into some intense video gaming. Or for some, something sweet to nibble on while waiting to play Rockband or Mario Party. So next time you attend a game party, consider bringing some controller cookies. At the very least, they'll give everyone something to talk about :D.
Controller Cookies
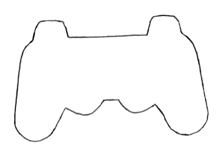
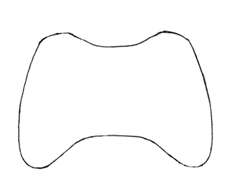
Cutting DoughTo customize the cookie shapes, I made stencils and traced them out onto the dough with a knife. So after making the cookie dough, print out the stencils provided above, and use them to cut out the cookies. Then bake them and let them totally cool before decorating. When printed, each stencil should be 2 5/8 inches wide at the widest point (theses stencils might have to be stretched out when copy and pasted onto MS Word).
Trimming Candy
Crows
To use the Crows, take kitchen shears and snip off the tops and bottoms of the gumdrops. These can be used directly as buttons or the Crow bottoms can be further modified with kitchen shears to form "+" control pads or other buttons, depending on the controller.
Good & Fruity

The ends of the Good & Fruity candies need to be cut off to make Xbox controller buttons. So with a knife, carefully cut off the tips of the red, blue, green, and yellow candies. A warning, this might take a couple of tries because the candy coating tends to crack rather easily.
PS2 Controllers
baked sugar cookies
sugar cookie icing
black food coloring
pink food coloring
red food coloring
green food coloring
Crows candy
Tint most of the icing black, setting aside a little bit of white icing for the the last step. Next, use a spoon to spread black icing on the cookies. Take two Crows tops and place them as the two larger gray buttons for each cookie. Then, take two Crows bottoms and cut them to make the two control pads on the top left and right sides. Use the scraps to make the three middle buttons: the triangle and the two rectangles.
Lastly, take that white icing that was set aside and tint 1/4 of it green, 1/4 pink, 1/4 red, and 1/4 light gray. With a toothpick, trace out a green triangle on the top button of the right control pad. Trace out a red circle on the right button. Trace a gray "X" on the bottom button. Finally trace out a pink square on the left button.
*Edit 7/7/11: When placing the rectangle and triangle buttons, follow the illustration, not the photos of the actual cookies. I'm embarrassed to say the buttons on my actual cookies are switched around. Thank you Jay, for pointing it out!
Xbox 360 Controllers
baked sugar cookies
sugar cookie icing
yellow food coloring
green food coloring
black food coloring
Crows candy
Good & Fruity candy
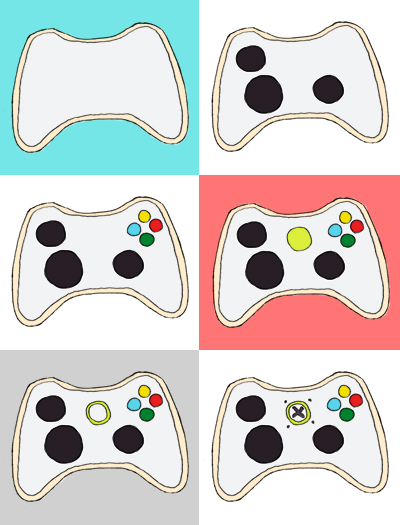
Tint most of the icing a very light gray, and tint a small portion of the icing neon yellow green with the yellow and green food coloring. With a spoon, cover the surface of each cookie with the light gray icing. Take two Crows tops and one Crows bottom and place them on the cookie as shown above. Then take the tips of one yellow, one blue, one red, and one green Good & Fruity, and place them as shown above to make the right control pad.
Next, take the yellow-green icing and make a circle in the top center of each cookie. Wait for it to dry. Then take the leftover light gray icing and make a circle within the yellow-green circle. Wait for it to dry. Lastly, take any leftover icing and tint it a dark gray. Use a toothpick and draw a dark gray "X" in the center of each light gray circle. Then make 4 dots, one on each "corner" outside of the circle.
N64 Controllers
baked sugar cookies
sugar cookie icing
blue food coloring
purple food coloring
Crows candy
mini M&Ms
white chocolate chips
mini yellow circle sprinkles
Tint all of the icing blue-purple, or whatever color you want the controllers to be. With a spoon, cover all the cookies with this icing. Next, take one of the Crows bottoms and cut out a "+" with kitchen shears and place it on the left side of the cookie. Take a red mini M&M and place it in the center of each cookie. Take green and blue mini M&Ms and place them as shown above to make the "A" and "B" buttons of the controller. Place four mini yellow circle sprinkles above that to make the right control pad.
Now take any leftover icing and tint it dark gray. Form a circle of gray icing with a diameter larger than the chocolate chip's below the red M&M on the cookie. Stick a white chocolate chip upside down in the center of the icing circle and hold it there until it can stand on its own. Wait for the icing to totally dry. Lastly, with a toothpick, carefully trace concentric circles, like a bulls-eye target, on the white chocolate chip with the dark gray icing.
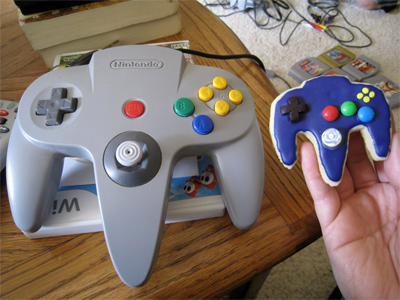
Size comparison of cookie to actual controller, photo by my friend.




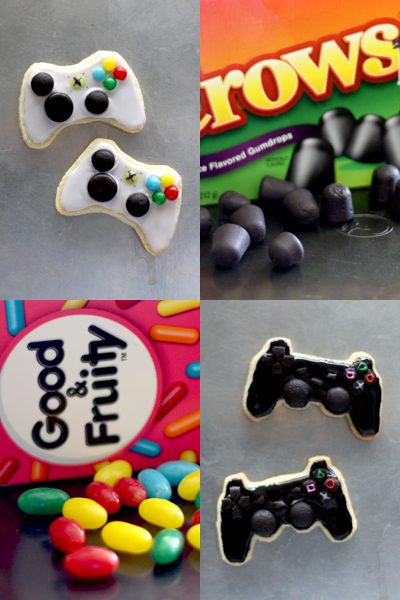




Candy for buttons!
ReplyDeleteWhy didn't I think of that...
they. are. awesome!!!!
ReplyDeleteAbsolutely terrific!! I'm going to try to make these cookies for my son's birthday. He'll love them! Thank you.
ReplyDeleteMs. Humble: I did try looking for white candies to use as Wii buttons, but the only ones I could find were breath mints... which I imagine would taste rather funny on cookies :P.
ReplyDeleteAnna: Thank you!
Anonymous: Ooh, that sounds awesome. Hope it goes well!
Those are the most amazing thing I have ever seen!! I'm going gaga over them.
ReplyDeletebittersweetsugarandsarcasm.blogspot.com
i love the xbox one (: esp. im a big fan of the console too :D ur cookies are soo great :D as always
ReplyDeleteHilarious! My son would go nuts over these. I may have to surprise him this weeks!
ReplyDeleteI love how you brought back the N64 controller.
ReplyDeleteRIP N64.
Rick: Haha, thank you!
ReplyDeletex.infinite: The xbox is actually the console out of these three that I don't have. But I found the controller appealing to make as a cookie :).
A SPICY PERSPECTIVE: Sounds good! I hope you try them out.
Ali: Yeah, N64 was the best! The game console of my childhood. Too bad it's so hard to find games for it now.
so cute and love the illustrations of the step-by-step! bravo!!
ReplyDeleteOh man!! This is so awesome, and right up my alley.
ReplyDeleteI've been wanting to make vid-cookies for a bit now, but I think out of all of the recipes I've seen I like this the most. The instructions will be super helpful.
Bravo!!
These look fantastic! Well done! I had a look through your blog and I was most impressed. It's all quite simply awesome!
ReplyDeletejomke: Thanks! I'm a visual learner, so I like providing people with lots of pictures whenever possible.
ReplyDeleteRae: Ooh, definitely make them. Especially since I just noticed that you're a video game tester! Awesome :).
Beks: Thank you! I'm glad you like it.
These are SO cute! So creative. :)
ReplyDeleteHa! Those are awesome! Good stuff.
ReplyDeleteSu-yin: Thanks :). Glad you like them.
ReplyDeleteBob: Thank you :D.
Hi, I love this idea (and all of your ideas!) I featured you on my blog at www.cuteeverything.com. Thanks again!!
ReplyDeleteMichelle: Thanks, and thank you for letting me know! I'll check it out.
ReplyDeleteOMG how cute! I wish I knew about these for our video game party! I would love to share with my readers.
ReplyDeleteNot Just A Mommy!: Thank you! Well, if you ever have another video game party :). Definitely feel free to share this with your readers.
ReplyDeleteI really love these photos.
ReplyDeleteI'm an online editor for http://www.techworld.com and http://www.computerworlduk.com
We are doing a slideshow on geek food, and I'd love your permission to use one of these images. It would be perfect! We would give you full attribution and a link back to your site.
Thanks and regards
Siobhan
Siobhan: Feel free to use any of these pictures. Thanks so much for asking!
ReplyDeleteThese are amazing, can't wait to make some =P
ReplyDeleteWest McGowan: Thanks. Glad you're going to try them out!
ReplyDeleteVery neat! I will definitely be doing a version of the PS2!!
ReplyDeleteAlso thought I'd mention.. The PS2 buttons are a bit switched around here haha - The rectangular select should be on the left and the triangle start arrow should be on the right and pointing the other direction. Nevertheless, PRETTY!!
xJay
Jay: Okay, that is super embarrassing! I can't believe I never caught that (and I'm a bit surprised that you're the only one who's pointed it out so far). Wow, good catch! I do remember thinking that there was something off, but I didn't bother figuring out what it was; well now I know, haha. I'll fix the cookie illustration this weekend :). Have fun making the cookies!
ReplyDeleteHI! I was planning on making the PS3 controller for a guy friend on Valentines Day, but alas, those Crows candies have eluded me. Do you have any suggestions for substitutions??
ReplyDeleteHi! Hmm, any sort of black colored candy that you can get your hands on. For the joysticks, maybe black M&Ms? If you can find any sort of black licorice gummies, you can trim them with kitchen shears to make buttons. Black round sprinkles for the round buttons.
DeleteIf you can find black candy melts, trace the button shapes out on a sheet of paper, cover it with a sheet of parchment paper, melt the candy melts and trace out the shapes with the melts.
(Just FYI, if you're in the US, I found the Crows candies at Walgreens.)
Susan this is sickkkkk!
ReplyDeleteI am excited that I found the templates for the controllers. I used them for a cake and coordinating cookies. Thanks again.
ReplyDelete