


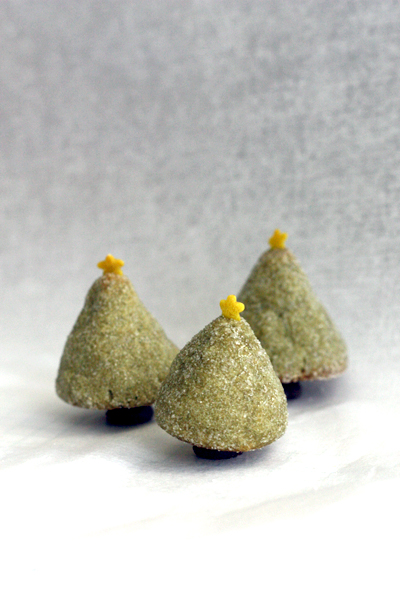
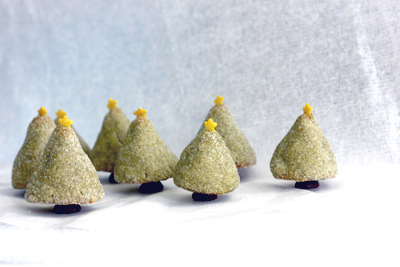
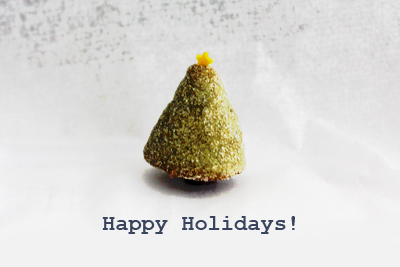
Sparkling sugar-coated green tea trees topped with yellow sprinkle stars and supported by chocolate chip trunks; it's a holiday forest pleasing to both the eye and the taste buds. My favorite part about them is that they actually do stand by themselves. And I know that Christmas is over, but even so, you can just skip the star sprinkles and just make a regular forest... of tree-shaped green tea cookies :).
Green Tea Sweets
adapted from Lovescool
3/4 cup powdered sugar
5 oz butter, cut into cubes
1 3/4 cup flour
3 large egg yolks
1 1/2 T matcha
1 cup sugar (for coating)
Mix the matcha and powdered sugar together. Cream the butter into the matcha/powdered sugar mixture until pale green and evenly mixed. Then mix in your flour until incorporated. Add the 3 egg yolks, mix until a dough forms, and gather the dough in a ball.
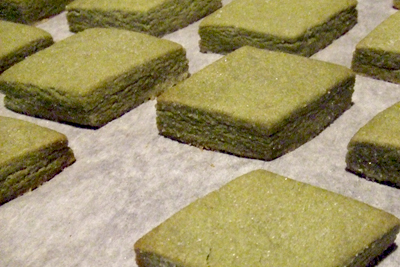
[If you'd like to make flat cookies instead of trees, at this point, place your dough between two sheets of plastic wrap and roll the dough out 1/2-inch thick. Refrigerate the sheet of dough for 30 minutes. Once firm, take out the dough and cut it out with a cookie cutter of your choice, maybe a leaf-shaped cutter or a diamond-shaped cutter. Coat each leaf in sugar and place on a parchment-lined baking sheet. Then bake as instructed below.]
Making Christmas Trees
star sprinkles (technically, mine are "daisy" sprinkles)chocolate chips
metal piping tip
plastic wrap
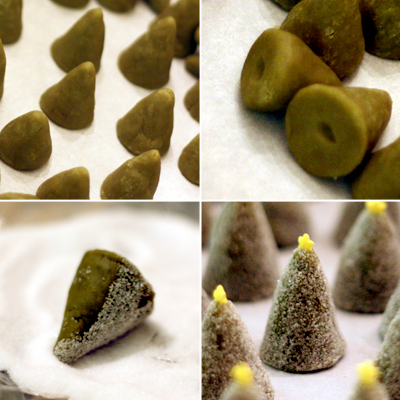
Take your dough and shape bits of it into little cones 3.5 cm tall and 2.5 cm in diameter (the cones will get shorter and fatter while baking, resulting in cones 3 cm tall and 3 cm in diameter). A trick to getting nicely shaped cones is to take a large metal piping tip and line the inside with a small piece of plastic wrap. Then fill the plastic lined tip with dough. When filled, pull out the plastic wrap along with your dough and you'll have a nice cone (you might have to make the tip a bit pointier with your fingers).
But you could also make the cones by hand. Place them upright on a parchment-lined baking sheet. Then, take a chocolate chip and make a dent in the bottom of each cookie so that the chocolate chip tree trunks can be attached after baking. Now refrigerate your cones for 30 minutes.
[*Edited 12/27/10:

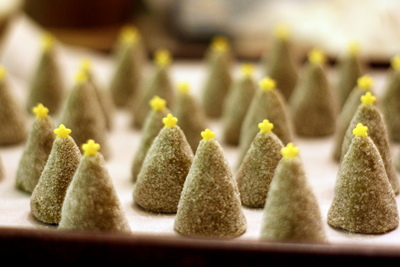
Preheat your oven to 350°F. Once chilled, remove the cones from your fridge. Pour the 1 cup of sugar on a flat surface. Roll each cone in the sugar, coating the sides, and replace on the cookie sheet. The cookies can be relatively close together on the baking sheet because they don't spread much in the oven. Carefully stick a star sprinkle in the top of each cookie. Then bake them in the oven for 12-15 minutes, or until the tips and bottoms start turning golden.
Let the cookies cool on the tray. When cool, melt some chocolate chips in the microwave or on a double boiler over the stove. Take a chocolate chip, dip it in the melted chocolate and press it into the dent on the bottom of one of your cookies. Then stand the cookie on a flat surface and hold it up for a few seconds until it can stand on its own. Repeat with the rest of your cookies. Enjoy!
[*Edited 12/27/10: Makes ~50 cookies.]
yummy yummy yummy!
ReplyDeleteOK these are crazy cute!! I am a new visitor to your blog and I love it! You are very creative and the photos are great! BTW: I love Matcha. Love the color and the flavor.
ReplyDeleteAllegra: Haha, thanks :).
ReplyDeletemarla: Thank you for the kind compliments! I'm so glad you enjoy my blog. And yes, matcha is wonderful; I love the color and flavor as well.
They are more than cute and festive:)
ReplyDeleteThese are insanely cute. I would feel like the Grinch if I ate one :)
ReplyDelete.:Kieran
La Table De Nana: Thanks :)!
ReplyDeleteKieran: Hehe, thank you. At least the recipe makes plenty. If you ate just one, it wouldn't be too bad :D.
How adorable and creative. A wonderful idea.
ReplyDeleteThese are so dainty and lovely. So creative!
ReplyDeleteJanet Marie: Thank you!
ReplyDeleteCarolyn: Thanks :)!
Very adorable! I could gobble up the whole forest!
ReplyDeleteY: Thanks. Haha, yeah it's quite tempting. It would be interesting to do so, cuz then you could indeed claim that you did eat a whole forest ;).
ReplyDeleteGreen Tea: No prob :).
ReplyDeleteAdorable! Those are beautiful!
ReplyDeleteHawkiepaw: Thanks!
ReplyDeletemy cookies collapsed :(
ReplyDeletedo you bake them directly on the baking sheet or on sugar?
icecreamcone: oh no!! I baked my cookies on a parchment lined baking sheet (not on sugar, I did my sugar coating on a piece of plastic wrap). What do you mean by collapsed? They fell down/tipped over? Or they're no longer cone shaped?
ReplyDeleteHmm... Did you chill them before baking? Is your oven at the right temperature? Also, make sure the pre-baked cones are taller then you want them to be because as they bake, the bottoms will spread a little bit, resulting in your trees being a bit shorter when they come out of the oven. (See the 3rd picture in the post vs. the 2nd picture, you'll notice that after baking, the cookies are shorter than the unbaked cookies).
hmmm, i baked them at 350 but only 4-5 minutes later and they collapsed... like completely fell flat on the pan
ReplyDeletethen again.. i used foil and didnt chill them right before baking haha
i'll give it another try today and hope it works! :)
these are reallyyyy adorable though. you're so creative to have come up with them :D
icecreamcone: That is... odd. Well I really do hope it works out, good luck! And thank you :).
ReplyDeleteThese are too adorable. Must try. :)
ReplyDeleteMine expanded and slumped as well. I did chill my cones for 30-plus minutes, sugared and topped them quickly, and used parchment paper to line my cookie sheet.
ReplyDeleteI *think* your 2.5 x 3.5 cm recommendation is a bit off as the only thing I see for a scale reference is the little stars and chocolate chips. Your cookies look to be about half the size or 1/8 the volume of what you suggest. I also got only 18 cookies from the batch, but you say the recipe makes "plenty." How many is "plenty?"
At least they taste great. :-)
I made a second batch this morning, increased fridge time to 45 minutes, made 27 cookies. Some still slumped, but not as badly. I'll make 'em even smaller next time and add a second fridge period after adding the sugar and stars.
ReplyDeleteMelody Fury: Thanks for the offer! Sorry I didn't see it till now.
ReplyDeleteKimberly: Try them :D!
Chthulhu: Thank you for the feedback. I'm glad to see that the recipe is starting to working out better. Because I saw your comment, I decided to remake these cookies again this year.
I can see how refrigeration time can vary depending on your refrigerator, etc. My house happens to be really cold this time of year, so I suspect that's why I can chill them for a shorter time.
But, the thing is that this time, I only made half of the recipe and I ended up with 25 cookies, so I imagine if I made the whole recipe, I'd end up with ~50 cookies (that's what I meant by "plenty"). This might sound silly, but are you using inches instead of centimeters to measure out the tree sizes?
I'm sure that my measurements are correct. The 2.5x3.5cm unbaked trees end up widening and shortening in the oven to 3x3cm. My chocolate chips are about 1cm in width, so as you can see in the final pictures, they make up 1/3 of the bottom of the cookie, which means that the cookies are indeed 3cm wide.
Here is a better picture of my unbaked trees, with a ruler for scale reference:
http://farm6.static.flickr.com/5130/5297968024_5eed6a0e40_o.jpg
Such yummi xmas trees :) I don't care if xmas has passed! I'm gonna try it today :D
ReplyDeleteThak you,
Carla Matador
Detox Diet
Where did you buy your matcha?
ReplyDeleteCarla: Haha, it doesn't need to be Christmas to make tree cookies!
ReplyDeleteHeather: I got my matcha at a Chinese supermarket in the tea aisle. Asian supermarkets in general tend to carry matcha powder.
nice idea! i'll give a try =)
ReplyDeletethanks♥
wow!!! thats such a great idea...green tea cookies! first time here, and should say, one great blog, this is...
ReplyDeleteI am thinking of making these for my husband who works at a tree farm.. I dont have access to Matcha but I was wondering if you thought this same technique would work with Sugar Cookie Dough?
ReplyDeletethank you! So creative!!
Absolutely lovely!! Thank you for sharing...
ReplyDeleteThis recipe failed miserably for me. I followed it to a T. The cones tipped and lost shape. I chilles before even. Plus they tasted horrible. Very dissapointed!
ReplyDeleteThese are insanely cute. <3 I tried some of these recipe at home but I wasnt able to make perfectly. I hope I will made the best this christmas. I am planning to collaborate with you to work on my site .Thanks again
ReplyDelete