


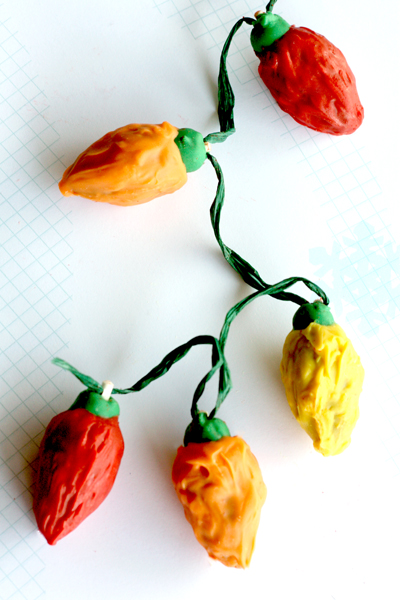
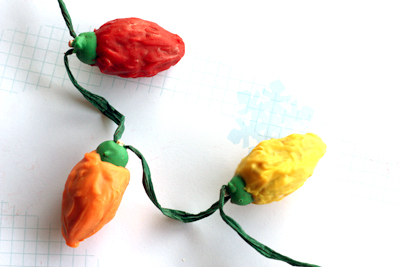
As you can probably see, I find holiday lights quite enchanting. This year I wanted to include something that evoked the whimsy of these lights in my cookie box. So, I came up with the idea for holiday light cake pops, a bunch of light shaped cake pops "wired" together with green string. They can be snipped off to be shared with friends, but they're most striking when all seen together.
My brother jokes that individually, these pops look like chili peppers because I used red, orange, and yellow candy melts. The really funny thing is that these fake lights even tangle like actual Christmas lights, so making them was an interesting experience. In the end, they were worth all the untangling :D.
Red Velvet Cupcakes
adapted from the New York Times1 cup cake flour
1/3 cup cocoa powder
1/2 tsp salt
2/3 cup vegetable oil
3/4 cup sugar
1 egg
2 tbsp red food coloring
1/2 tsp vanilla
1/2 cup buttermilk
1/2 tsp baking soda
3/4 tsp vinegar
Preheat oven to 350°F. Mix the dry ingredients: cake flour, cocoa powder, and salt. In another bowl, whisk the vegetable oil and sugar together. Add the egg. Then mix in the red food coloring and vanilla. Mix in half of the dry ingredient mixture followed by half of the buttermilk. Repeat with the other halves.
In a small bowl, combine the baking soda and vinegar. Add that into your cake batter. Spray a loaf pan with non-stick spray, pour in your cake batter, and bake for 20-25 minutes, or until a toothpick comes out clean. Let the cake cool in the pan.
Cream Cheese Frosting
adapted from Epicurious.com8 oz cream cheese, room temperature
3 tbsp butter, room temperature
1/2 tsp vanilla extract
1 cup powdered sugar
Combine the cream cheese and butter until smooth. Add the sugar and vanilla.
Making the Lights
cream cheese frosting
8-inch lollipop sticks
green string
green candy melts (for light base)
three colors of candy melts (for light bulbs)
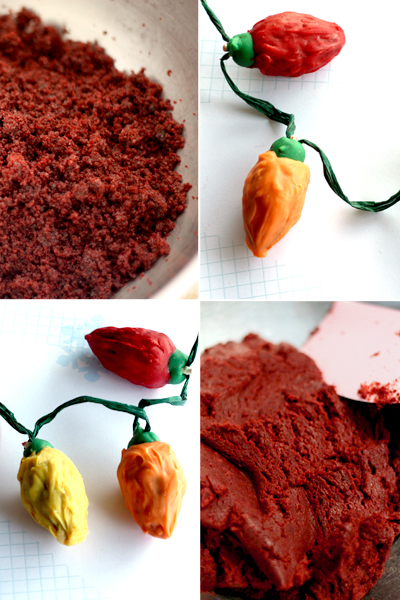
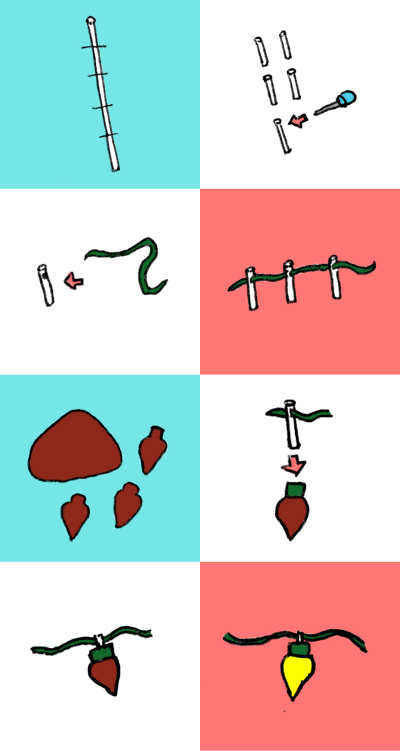
Crumble up your red velvet cake when it's cool and mix in the cream cheese frosting until no more streaks of frosting remains. Take little chunks of the red velvet "dough" and shape them to look like lights, pointy little bulbs with knobs at the end. Repeat with all your dough. Place them on a baking sheet lined with wax paper, plastic wrap, or parchment paper. Freeze or refrigerate until firm.
Take the lollipop sticks and cut them each into 5 pieces. At the end of each tiny stick, pierce a hole with a sharp object. Thread all the pierced sticks onto the green string. A easy way to do this is to tape the end of the string to a point and use the taped end to string up the sticks (snipping off the tape afterwards). Space the sticks about 2 inches apart.
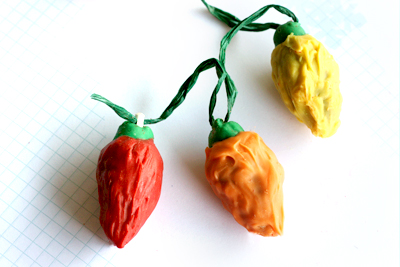
Once the cake bulbs are firm, take them out. Melt your green candy melts. Dip the knob at the end of a cake bulb in the green coating and then push one of the sticks into the dipped end. Repeat with the rest of the bulbs. (At this point, if the cake is no longer firm, refreeze or refrigerate them again.) Now melt one color of candy melts for your lights. Dip the first cake bulb on the string in the melted coating. Skip the next two bulbs and dip the fourth bulb in the candy melts. Repeat skipping two bulbs between dipping.
When you finish the string with that color, melt a different color of candy melts and dip the second bulb into the coating. Skip two bulbs and repeat with the rest of the string. Finally melt your third candy melt color and dip the remaining uncoated cake bulbs in the coating. Enjoy!
Those are just darling! Very creative!
ReplyDeleteAdorable. I saw this on Tastespotting and I just have to say you are very creative.
ReplyDeleteRachelle: Thank you so much.
ReplyDeleteChris: Hehe, thanks :D.
Wow, very nice. I love these!
ReplyDeleteVery creative idea. This is so cool!
ReplyDeletethat is so cute!
ReplyDeleteLove the lights! Bet they were delicious. Happy New Year!
ReplyDeleteHow CUTE!!! I'm bookmarking it for next year :) Thanks for the detailed instructions too!
ReplyDeleteso freaking cute!!!
ReplyDeleteElizabeth, fabricatedends, Jeanette, & Tia: Thanks so much for the comments!
ReplyDeleteMegan: Yup they were :). Happy New Year to you too!
Flirting with flour: Thanks! And you're welcome for the instructions.
they look soooo cute!! nice idea..love it..
ReplyDeletewishing u a very Happy new year :)
Wow! I just saw these on Foodgawker. Completely blown away by your creativity. Great work!
ReplyDeleteB&D: Thanks! Happy New Year to you as well.
ReplyDeleteshaz: Thank you!!
I'm a newbie baker. What are candy melts and where would I find them in a grocery store? Where would I find lollipop sticks?
ReplyDeleteLove the ideas! Thanks!
Randi: Candy melts are sort of like colored white chocolate, used to make colored molded candies. Candy melts and lollipop sticks can be found at craft stores like Michaels or Joanns. They can be found at Walmart too.
ReplyDeleteThey look like this: http://www.wilton.com/store/site/product.cfm?id=3E310A5F-475A-BAC0-513EBB4AAC195A7E.
Just made these for a holiday office party and they were a huge hit - thanks!
ReplyDelete