


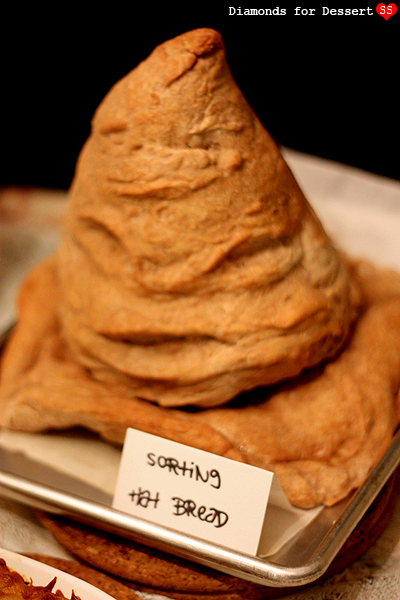
I needed a bread recipe that used whole wheat flour, which would give the dough a darker color. Also, the bread dough needed to be pliable and not expand too much while baking. I decided on a pita bread recipe based on a memory of my attempt to make pita bread. I remembered that pitas contain ww flour and are easily shaped. I also knew from experience that when the pita breads aren't rolled out thin enough or if the oven temperature is too low, pitas don't puff up, which was bad for making pita bread, but perfect for my Sorting Hat idea.
I tried it out on the day of the party, hoping it would work as I planned. I made the dough, shaped it, and baked it. It was a success! I chose to serve it along with a spinach and artichoke dip I made right before the party. The Sorting Hat bread turned out to be quite an interesting but delicious dish at my Harry Potter feast.

Sorting Hat Pita Bread
adapted from Baking with Julia by Dorie Greenspan1 tsp active dry yeast
1 tsp sugar
2 1/2 cups warm water (80-90°F)
3 cups whole wheat flour
1 tbsp salt
1 tbsp olive oil
2-3 cups flour
In a large bowl, add the sugar and warm water. Stir in the yeast and let the mixture proof for 10 minutes. Once the yeast is bubbly, mix in the whole wheat flour, one cup at a time, until the mixture is silky smooth. Then set aside the mixture for 30 minutes to 8 hours (the longer this sponge is left alone, the better the flavor). Once time is up, stir in the salt and olive oil. Then mix in the flour. Knead the dough for 8-10 minutes, then cover the bowl with plastic wrap and let rise for 2-3 hours, until doubled.
Making the Sorting Hat
pita bread dough (above)foil
nonstick spray
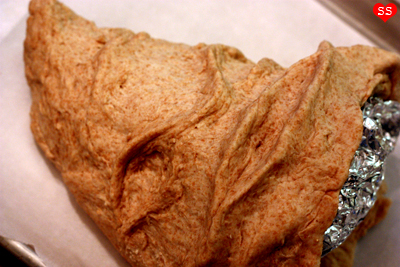
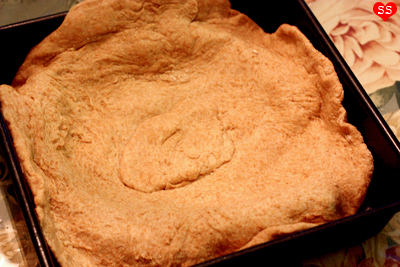
Preheat your oven to 350°F. Form a large cone out of foil, about 8 inches tall and 6 inches in diameter. Punch down your dough and take 2/3 of it, keeping the remaining third covered. Spread out the dough in a large circle, like you would a pizza crust, so that it's big enough to cover the cone. Spray the foil cone with nonstick spray and then cover it with your dough. Pinch deep grooves for the eyes, mouth, and random wrinkles. Place the dough covered cone on a baking sheet,on its side, face side up.

Raise the temperature of the oven to 425°F. Now either spray the bread with the face with nonstick spray or brush it with melted butter. Stand the dough up so that it's no longer on its side. Lower your oven racks so the bread fits and place both trays of bread back in the oven. Bake for 15-20 minutes or until browned. Let cool a bit on a cooling rack. Finally, place the bread covered foil cone on top of the hat bottom when ready to serve.

Spinach and Artichoke Dip
adapted from cookinglight.com2 cups shredded part-skim mozzarella cheese
1/2 cup fat free plain yogurt or sour cream
1/4 cup fresh grated Parmesan cheese
1/4 tsp black pepper
3 garlic cloves, crushed
1 (14 oz) can artichoke hearts, drained and chopped
1 (8 oz) block 1/3-less-fat cream cheese, softened
1 (10 oz) package frozen chopped spinach, thawed, drained, and squeezed dry
Preheat oven to 350°F. Mix 1 1/2 cups mozzarella cheese with 2 tbsp Parmesan cheese. Add in the yogurt, pepper, garlic, artichoke hearts, and spinach. Mix to combine. Then add in the cream cheese. Transfer the mixture into a 1 1/2 quart baking dish. Top with the remaining 1/2 cup mozzarella and 2 tbsp Parmesan. Bake for 25-30 minutes or until golden and bubbly. Serve hot.
Makes 5 1/2 cups. (In my picture above I used 2/3 of the recipe)
Your instructions are always so wonderful. This is so cute.
ReplyDeleteMmmm delicious looking and detailed instructions! What more could you ask for? <3
ReplyDeleteJeanette: Thanks! I'm always relieved that my instructions make sense :).
ReplyDeleteJess ♡: Thank you! I'm glad that my instructions are useful!
So cute! Love this idea!! :)
ReplyDeleteSara: Hehe, thanks.
ReplyDeleteWow. You are quite clever. If my kiddo ever asks for a HP party, I know right where to go for a menu!
ReplyDeleteoneordinaryday: Why thank you :D! Yay for HP parties, haha.
ReplyDeleteThat. Is. Ridiculous.
ReplyDeleteSeriously - so freaking amazingly awesome! How are you so creative? I really want to try this... (now that I've finally started watching all the HP movies... seriously...I don't know what was wrong with me! heh)
Jenni: Thanks! Try it out! The end effect is worth it. And yay for HP movies, haha.
ReplyDeleteThis is so awesome! I just made it today, but mine didn't turn out nearly as cute as yours. I blogged about it with a link back to you. I'll have to give it another go when Part 2 of Deathly Hallows comes out next year. You're so creative, and this is seriously cool.
ReplyDeleteI am totally making this sorting hat bread and dip for my midnight release HP party!
ReplyDeleteMy cousin and I both saw this and bought all the stuff on a whim at like 10 o'clock one night, never made bread before in my life and we totally did a test run of baking this, and the face got horribly smooshed because we didnt rotate it enough, lol, it didnt look nearly as pretty as yours but it tasted really good! I'm hoping to prefect it for my party =)
Courtney: Part 2 of Deathly Hallows is almost here (wow, late reply)! I'm glad to hear that it turned out okay :).
ReplyDeleteAnonymous: HP Party! That's pretty awesome for a new bread baker, congrats. The face is a bit tricky to do because the dough puffs up when baking, so make sure that when you shape it, you make the wrinkles quite deep.
Amazing, I'm going to make it this week for a harry potter movie marathon. Stupid question - if you take the foil cone out of the hat once it's cool, will the bread collapse or keep its shape?
ReplyDeletei made this yesterday for my friend's 25th harry potter themed surprise birthday party that her hubby organized! it turned out fantastic; not as cute as yours but the taste and texture was perfect! everyone loved it! the only difference i found when trying your recipe was that it took much longer than 10 minutes to "proof" the yeast (more like 20 minutes till it turned "bubbly") but your instructions and recipe was so easy to follow! thanks so much for taking the time and effort to complete this to motivate myself to make this! will definitely be using this pita bread recipe and sculpting some different themes! <3
ReplyDelete