


A few weeks ago, I kicked off the summer with a 1920s cocktail party. I had just seen The Great Gatsby in theaters a few days before the party, so I was pretty inspired to make a lavish, yet delicate dessert. There's this one scene where Gatsby, Daisy, and Nick have tea at Nick's little cottage. Gatsby has all these lovely flowers and desserts (macarons and tiered cakes) brought into to fill up the house. At first I was going to bake macarons, but that seemed too obvious of a choice. And I didn't want to make a full cake since it was a cocktail party with appetizer-type foods. Finally, I settled on petit fours.

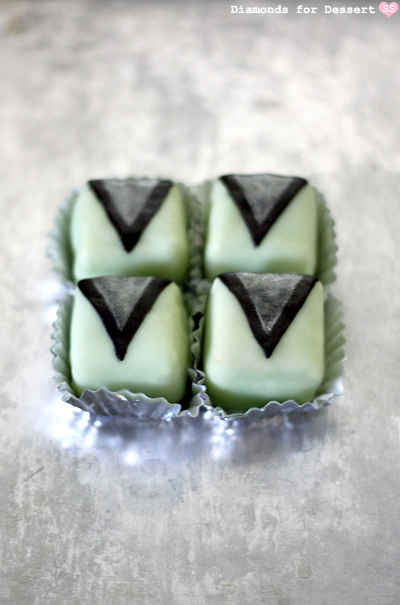
While searching for the perfect petit fours recipe, I came to the conclusion that they are difficult to make.... which pretty much sealed the deal, since you all know I love a good baking challenge. Since petit fours tend to be little square cakes, I decided that it would be fitting to decorate them in an Art Deco style (popular in the 1920s), with geometric shapes and clean lines. I searched high and low for the perfect cake and poured fondant recipes to use, to make sure this would be a success.

I knew a variety of different cakes could be used for petit fours, but I ended up with a sturdy genoise since I wanted a cake that wouldn't fall apart when I dipped them in fondant. Also, I found the perfect poured fondant recipe. I wanted a fondant that was opaque and good for dipping, so this fit the bill. And yes, though it's called "poured" fondant, I decided to dip the cakes in fondant rather than pour them since pouring fondant seemed to be the biggest hassle for bloggers making petit fours. So in the end, this turned out rather well, not really a challenge after all. Lovely little cakes, perfect for a party.

Art Deco Petit Fours
Genoise
adapted from Baking with Julia

1 1/4 cups cake flour
2/3 cup sugar
1/8 tsp salt
4 egg yolks, room temp
2 eggs, room temp
3 tbsp butter, melted
1 tsp vanilla extract
jelly (flavor of your choice)
Preheat the oven to 350°F. Spray a 9 x 9" square baking pan with nonstick spray. Line it with parchment paper. Set aside for later.
Sift the cake flour, 1 tablespoon of the sugar, and the salt onto a piece of wax paper or foil. Set aside for now. Mix the eggs, egg yolks, and 1 tablespoon of the sugar in a large mixing bowl and mix. Add the rest of the sugar and mix.

Use a mixer on medium speed to whip the mixture 4-5 minutes, until it is pale and has tripled its volume. (When you lift up the mixer, the egg mixture will fall in a ribbon that lasts 10 seconds on the surface of the mixture. Keep mixing if the ribbon disappears too fast.) Mix in the vanilla extract.

Add 1/3 of the flour from earlier. Use a spatula to gently fold in the flour; stop when the flour is incorporated so you don't over mix. Fold in 1/2 of the remaining flour. Repeat with the last bit of flour. Take about 1 cup of the batter and place it in a small bowl with the melted butter. Fold the butter into the cup of batter. Once the butter is incorporated, fold the batter back into the rest of the cake batter.

Move the batter into the square baking pan you previously prepared and smooth it out. Bake for about 20 minutes, until it springs back when you press the cake. Let cool in the pan for 5 minutes, then lift the cake out with the edges of the parchment paper and place on a wire rack to finish cooling.

Once the cake is cool, cut it into 36 cubes. Then, slice each cube in half sideways (like a sandwich). Take three cake slices, spread a thin layer of jam between the slices to glue them together, and place them on a baking tray or a freezer safe container. Repeat with the rest of the cake slices. Freeze the cakes for 30 minutes before dipping them.
Poured Fondant
adapted from King Arthur Flour
5 oz white chocolate chips or white candy melts
4 cups powdered sugar
1/4 cup honey
1/4 cup hot water
1 tsp vanilla extract
green food coloring

Boil water in a saucepan (this is separate from the hot water above).

Mix the powdered sugar with the honey in a heatproof bowl that will be able to rest comfortably in the saucepan of boiling water. Pour the 1/4 cup hot water over the sugar and honey. Mix until smooth. Melt the white chocolate chips in a separate bowl. Scrape the melted chocolate into the powdered sugar mixture and stir until smooth. Add the vanilla and a little bit of food coloring and mix.

Remove the pan of boiling water from the stove and place the bowl with the fondant in the pan to keep the fondant warm and melted. Use a fork to dip one of the frozen cake stacks in the fondant. Place the dipped cake on a wire rack to dry. Repeat with the rest of the cake. Stir the fondant every so often to keep it smooth. Wait for all the dipped petit fours to dry before decorating.
Art Deco-fy the Petit Fours
sugar cookie icing
black gel food coloring
gold pearl dust

flat paint brush

Make 1/4 of the sugar cookie icing recipe. Tint it black with gel food coloring. Use the icing to draw the outline of a triangle on each petit four. Fill in the triangle outlines with icing. Let the icing dry before proceeding. Take a flat paint brush and dip it in the shimmer powder. Use it to draw a shimmery triangle inside the black icing triangle. Go over the triangle with more powder to make it more opaque. Repeat with the rest of the petit fours.

Oh gosh that looks all too ravishing to even nibble on! I must try this recipe out. Thank you so much for sharing!
ReplyDeleteMichelle
www.michelleesque.com
I also like to try this recipe once. The information you published is useful in many ways. The right path of expressing your own self is laudable. Looking forward to reading a lot more.
ReplyDeleteThese look so stylish! And so much attention to detail in hand-painting each one!
ReplyDeletevery interesting, I will learn to do it, hopefully I will be successful.
ReplyDelete