


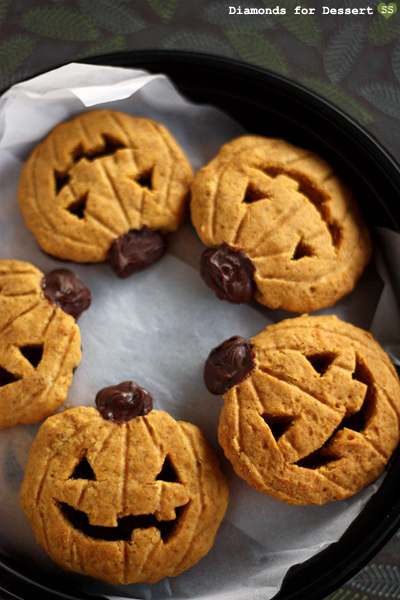
Every year, I always think about carving a Jack-o'-Lantern, but I never do. It's always either realizing I have nowhere to put it or being too lazy to clean up the mess that comes along with it. Well, this year, I came up with a solution to this desire to carve something: Jack-o'-Lantern cookies, carving cookies not pumpkins. It's entertaining and not too difficult to do. Plus pumpkin and chocolate just seem to go very well together. Overall, a fun and delicious fall activity.


Jack-o-Lantern Cookies
adapted from verybestbaking.com
2 1/2 cups flour
1 tsp baking soda
1 tsp baking powder
1 tsp cinnamon
1/2 tsp nutmeg
1/2 tsp salt
1 1/2 cups sugar
1 stick butter, soft at room temp
1 cup canned pumpkin
1 egg
1 tsp vanilla extract
semisweet chocolate (for decorating)
Mix dry ingredients: flour, baking soda, baking powder, cinnamon, nutmeg, and salt. Set aside for now. In another bowl, cream sugar and butter together. Mix in the egg, followed by the vanilla extract. Add in the pumpkin and mix. Add in the dry ingredients and mix until a dough forms.
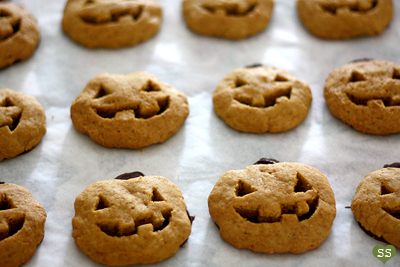
Preheat the oven to 350°F. Place dollops (of about 2 tbsp) of the sticky dough onto parchment lined baking sheets, there should be about 30 of them all together. Wet your fingers and smooth out the dollops of dough to form flat ovals (they will puff up while baking). Place the sheets in the oven and bake for 10-15 minutes, or until firm. Let cool on the sheets for 2 minutes, then move to a cooling rack.
Shaping Jack-o'-Lanterns
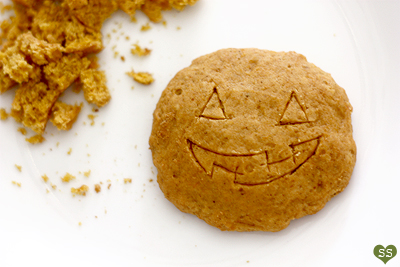
Use a knife to cut out faces on your cooled pumpkin cookies. Poke out the cutout portions and brush off any crumbs. At the top of each cookie, cut a small triangular wedge for the stem.
Melt some semisweet chocolate. Spread ovals of chocolate about the size of the cookies on a piece of parchment paper. Place a cookie on each chocolate oval. Use a spoon and place a dollop of chocolate at the top of each cookie where the wedge was cut out to form the stem. If the stem isn't tall enough at first, wait for the first layer of chocolate to dry and then add another layer on top. Let all the chocolate dry. Then carefully peel the cookies off the parchment paper.
Finally, take a spatula, or another utensil with a thicker edge, like the blunt edge of a butter knife, and use it to press out/score vertical lines on the cookies to make them more pumpkin-like.
Makes 28-32 cookies.

These are SO CUTE! and look delicious too~!
ReplyDeletewow they look great! You must have great precision to not cause any of the biscuits to break. Awesome job!
ReplyDeleteThose are incredible!
ReplyDeleteThese are really cute and I know my grandsons would really love them. This is my first visit to your blog, so I took some time to browse through your earlier entries. I'm so glad I did that. You've created a great spot for your readers to visit and I really enjoyed the time I spent here. I hope you have a great day. Blessings...Mary
ReplyDeleteThese cookies are adorable! I can't believe you hand carved each one! Very impressive.
ReplyDeletewhat a great idea! I would never thought to carve a cookie after baking them :)
ReplyDeletethese look great and you make them look so much easier than I am sure they are... I think that next year you should carve a pumpkin, no more clean-up than some baking!!
ReplyDeleteAnonymous & Andrea: Thanks!
ReplyDeletethanhalang: It wasn't bad since the cookies are quite sturdy and don't break easily.
Mary: Welcome! And thank you. I'm glad you like my blog :).
Kristen: Thanks! It wasn't too difficult.
little random happiness: Now I have a new cookie decorating/shaping technique to use more often in the future.
Rachel: Haha, I think I will. It's about time anyway.
I love these - they are so cute! For some reason I only just got my email update from your site so I've missed Halloween, but I'm bookmarking these for next year!
ReplyDeleteThe little craggily faces are perfect! It gives the right sort of Halloweenie mood. I'm pretty sad that I saw these after October 31st, but I'm sure as hell going to use the technique as soon as I can.
ReplyDelete(Also, I hope you have time to enter our Movember Manly Cupcake Contest again! :) )
THEY WERE DELICOIUSLY AWESOME! so fluffy and pumpkin-y. you must make more sometime soon.
ReplyDeletesuper cute!! I totally know what you mean. I bought a mini pumpkin and was going to carve it but thought about the time and mess I would have to clean up and now it is inevitably sitting on my counter. Carving cookies is a much more tasty and cute idea ;)
ReplyDeleteThese are adorable!
ReplyDeleteThat was so interesting. Very nice insights and your cookies are adorable too - I'm impressed. Great tips! keep it up!
ReplyDeletethelittleloaf: Glad to hear you'll be trying it out next year!
ReplyDeleteC&C Cakery: Thanks! Sorry I posted this so late :(. But it is an interesting technique.
tiffany: Haha, thanks! Glad you liked them. I will bake some more stuff for our future get togethers.
Erica: I've done that too many times. Luckily mini pumpkins are cute as decorations even when uncarved.
Lora: Thanks!
shirley: Thank you. Glad you enjoyed the post.
Those cookies look awesome!
ReplyDeleteSo I tried to cook them... but it seems I didn't use the right quantities.... How many grs. is a stick butter? and how many grs. is a tsp spoon? I used a cup of butter and a 5 grs. spoon... and my cookies look flat and are not crunchy :(
Please help!
thanks!!
I think Ill draw on the faces with black decorating frosting..
ReplyDeleteCan you put the score marks on the dough before baking
ReplyDelete