


Stained Sunglasses Cookies, with cookie frames and candy lenses. They're a twist on the stained glass cookies that are made during the holiday season, adapted for summer. Colorful, crushed candy pieces melt to become lenses as the sunglasses frame cookies bake. After cooling, the eyepieces are "glued" onto the frames with semisweet or white chocolate to finish off these playful, edible sunglasses.
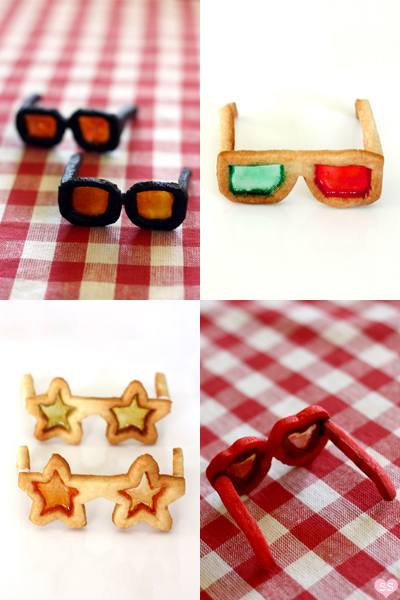
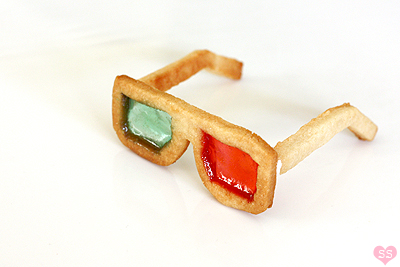
The fun part about these is how customizable they are. I used images of interesting sunglasses: red heart lenses, Lady Gaga's Mickey shades, funky star glasses, the popular oversized black lenses, trendy round shades, and even the old school 3D glasses for the patterns. The dough can be dyed with food coloring to change the frame coloring, while an assortment of hard candy can vary the lens tinting. By the way, the larger actual sunglasses-sized cookies are actually easier to make than the smaller ones, but in the end, they're all worth it.


Stained Glass Cookies
adapted from Erica OBrien
1/2 cup butter, room temperature
1/2 cup sugar
1/4 cup brown sugar
1 tbsp light corn syrup
1/2 tsp vanilla extract
1 egg, room temperature
2 cups flour
1/4 tsp salt
3/4 tsp baking powder
30-40 hard candies (lifesavers, jolly ranchers, root beer barrels)
food coloring (red or black)
chocolate chips
Mix the dry ingredients, the flour, salt, and baking powder together. Set aside for now. Cream the butter and the two sugars. Add the corn syrup. Mix in the egg, followed by the vanilla extract. Add the dry ingredients to the wet ingredients until incorporated. Split the dough in thirds, tinting one third with red food coloring, another third with black food coloring, and leaving the last third plain (or whatever color combination you prefer). Then wrap each third in plastic wrap, flattening them into discs. Refrigerate the dough for at least an hour.
While waiting, unwrap the candies and divide them up by color. Place the candy in plastic bags and wrap them with paper towels. Take a mallet and crush the candies. Transfer the small candy pieces to bowls and cover the bowls with plastic wrap until ready to use (some candy tends to get sticky and clump together when left out in the air). Preheat the oven to 375°F. Take out one dough disc and sandwich it between two pieces of plastic wrap. Roll out the dough to 1/8" for the small sunglasses or 1/4" for the large sunglasses.
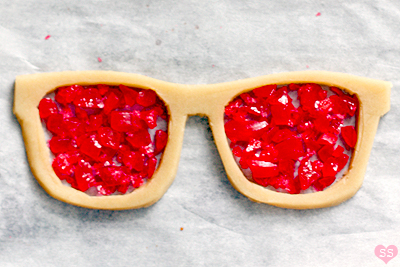
Cut out the paper stencils provided below. Lightly oil the stencils before use so the paper doesn't stick to the dough. Use a knife to cut out the eyepiece stencils on the dough first (without cutting the lens holes yet). Transfer the cut out pieces onto parchment lined baking sheets. Gather dough scraps in a ball and refrigerate till chilled enough to cut. Place the baking sheets with the cutouts in the fridge for 10 minutes or until the dough is chilled. Take out the sheets and carefully cut out the lens holes on all the eyepieces and any embellishments with a knife (the small sunglasses lens holes should be estimated, no stencils provided for lens hole). Fill the lens holes with pieces of candy. Avoid getting candy on the dough. Chill the baking sheets again.


While waiting, cut out the right and left earpieces (flip over the provided earpiece pattern to cut the other earpiece) and transfer them to a parchment lined baking sheet. Chill the sheet of earpieces. Bake the eyepiece cutouts until the cookies are firm and barely browned (5-7 minute for small sunglasses and 7-10 minutes for large sunglasses). Let cool on sheets for 1 minute before transferring the parchment to a cooling rack. Then bake the earpiece cutouts (4-6 minute for small sunglasses and 5-8 minutes for large sunglasses). Let cool on sheets for 1 minute before transferring the parchment to a cooling rack. Once cooled, carefully pull the cookies off the parchment.


These are amazing! Pretty much the cutest thing I have ever seen. :-D Adorable!!
ReplyDeleteIncredible! Sooo creative!
ReplyDeletesun protection + a snack, it just can't get any better on a summer day!
ReplyDeleteWow. I mean, wow. I posted a link on my column (ediblecrafts.craftgossip.com). Wow!
ReplyDeleteWow, they look really good. :D
ReplyDeleteOk - flat out you win the coolest cookie award. These are amazing! - Megan
ReplyDeleteThe future's so bright...I gotta eat cookie shades.
ReplyDeleteGreat stuff!
ReplyDeleteI wonder if fashionistas could make a pair with giant C's on them a la Chanel. How cute would that be! And much cheaper than the real thing. ;)
ReplyDeleteAbsolutely darling!!!
ReplyDeleteWow I love this, and so funny because I JUST made a Lady Gaga cake: www.cakehero.com. We are obvs cake & cookie soulmates! : )
ReplyDeleteGreat work, I just love this blog.
Sara, Lora, AnnaNova, Lily, ediblecrafts, Megan, Carolita, naomi: Thanks!
ReplyDeleteAli: Haha, of course.
Carolyn: I actually did think about that! (But I was too lazy). Sounds like it could be done with a little bit of white chocolate though.
Cake Hero: Haha, I'll definitely check it out. Lady Gaga is awesome. Our minds are insync :).
Love it!
ReplyDeleteI would like to invite you to participate in my giveaway http://atasteofkoko.blogspot.com/2010/08/mini-pistachio-tea-cakes-40.html
Love love love them! So adorable and creative!
ReplyDeleteOk, these are seriously & majorly
ReplyDeletecreative. If only, I could bake I
would be in business. For now,
I'll have to marvel at these beauties.
Cheers!
This is truly ingenious.
ReplyDeleteThese are just too cute!!
ReplyDeleteSo, so cute! Will be trying this one out!
ReplyDeleteAHHH!! So cute!!!
ReplyDeleteThese are so cool, well done you! x
ReplyDeleteYou're so wonderfully creative! This must have taken you ages. I love the 3D ones, do they work? ;-)
ReplyDeleteHungry Jenny x
These are so pretty! Definitely want to make these to celebrate the start of summer next year !
ReplyDeletejust saw these at Tastespotting, very cute!
ReplyDeleteJane Ko: Thanks, I'll check it out.
ReplyDeleteStef, Reginald, Eric, cindy, GardenPig, Princessy Tam Tam, Caroline: Thanks!!!
AmyBakesEverything: Yay, I hope you do try it out :P.
Hungry Jenny: Thank you :D. Haha, I never did try them out. I have my doubts about them working, but it'd be cool if they did!
Ahh another great baking creation. Love the idea of the stained glass!
ReplyDeleteomgawdd theyre soooo cute!!!! >< looks too difficult to make lol
ReplyDelete3D glasses cookies =D
ReplyDeleteSweet!!!!
ReplyDeleteThese look like just the job for me. I'll have my pals Stewie and Roscoe over and have them bake me a batch.
ReplyDeleteThose look really awesome. Such a creative idea!
ReplyDeleteHow fun! I can't wait to try these!
ReplyDeleteyuns & AShu93: Thanks, glad you guys like them.
ReplyDeleteJanice: Haha, they aren't too difficult to make, just a bit time consuming.
West McGowan, Come At Me Bro, Anonymous: :P/:D!
mybakingempire: Yay, hope you try it out :).
Too cute!
ReplyDeleteCutest stained glass cookies EVER!!!
ReplyDeleteAw these are so cute!
ReplyDeleteLaUrIe, Jenn, & Y: Thank you!
ReplyDeleteWow what fun idea for a spring party and I'm starting to get tired of the cupcake craze.
ReplyDeleteWooooooooooooooooowwwwwwwwwwwwwwwwwwwwwwwww. I need to make these, they're amazing! I want to just try a few before I make a gajillion, though, for practice- How much does one recipe make?
ReplyDeleteThese are possibly one of the cutest most creative cookies I have ever seen. LOVE them.
ReplyDeleteOH my goodness, can you say absolutely brilliant?! This is amazing and will sure be saving this one for the book! Thank you for sharing your secrets and beautiful pictures...
ReplyDeletehttp://www.thefinishing-school.com
you're a pretty smart cookie you know that ;]
ReplyDeleteI just wanted to say that I tried the recipe and it was good! A little too much sugar for me though. My first batch burnt because me and my cousin forgot to watch the time xD but the 2nd one turned out good. When we were mixing the batter we were wondering if it would turn out right cuz it didn't seem to get anywhere but it finally took form. A few questions though: Does it really make a difference if we used regular sugar in replacement of brown sugar? And how did you make the lighter tinted lenses? I'm having trouble with that.
ReplyDeleteHappy to Be Me, Lora, Dagmarette: Thank you for your comments!
ReplyDeleteicefox: I don't remember how many cookies the recipe makes exactly since I made various sizes of sunglasses, but I know it makes quite a lot. Perhaps have a cookie party with friends and share the dough?
Anonymous: Hehe, thanks :P.
Nancy: Thank you for sharing. I'm glad to hear you tried it out! I think that regular sugar can be used instead of the brown sugar in this recipe.
For the lighter tinted lenses, I used jolly ranchers. They seem to turn out lighter after baking. But they burn easier too, so be sure to watch them carefully. Definitely try experimenting with different hard candies to get different lens tints.
how many little glasses does this make?
ReplyDeleteohh sorry just read your comment above..and also thanks so much! i couldn't find any little glasses ideas this is perfect!
ReplyDeleteahh I love them especially the heart ones and the mickey mouse ones! This is really cute for like a birthday party or something.
ReplyDeleteAnonymous: I don't remember exactly how many, but I know that it makes a lot of small glasses, since they don't use a lot of dough. Oh, nm, read your 2nd comment, hehe.
ReplyDeleteElle: That's the fun part about this recipe. You can make any sunglasses design you want :D.
This was so cute..
ReplyDeleteGreat imagination..
Best regards,
sunglasses
Oh my gosh these are so lovely!!! This tutorial is amazing too. Thank you so much for these wonderful ideas for sunglasses. Great for a pool and beach party. I just had to share with my followers too! http://blovelyevents.com/2013/06/05/keeping-cool-with-some-shades/#more-2946
ReplyDeleteI love your blog and your cookies :) I have used your template here http://www.bperbiscotto.com/2013/06/Biscotti-estate-come-fare-senza-stampini-o-formine-i-biscotti.html
ReplyDeleteThank you for sharing it.
Annamaria
If you can imagine, I just did these (Just the eye glass part without the sides) with a class of younger students with Autism Spectrum Disorder. Thank you so much!!! They did great rolling the dough inside parchment paper and crushing the candies with a rolling pin.
ReplyDelete