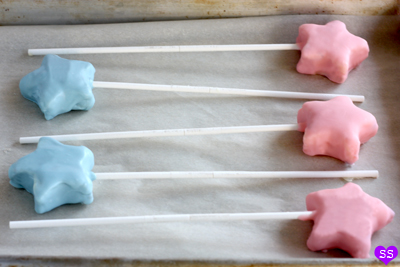
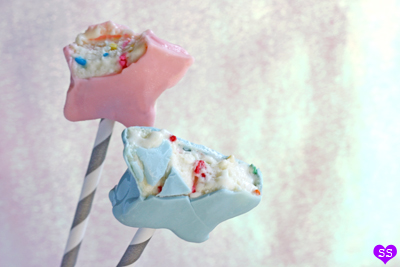
I had this idea to make pastel pink and blue fairy wand ice cream pops: star-shaped with a cute striped stick. I was inspired by Deborah Lipmann's "Glitter In The Air"
 nail polish, Little Twin Stars (Sanrio), and the Fairy Godmother from Cinderella. To make them even more fanciful, I made my own cake batter ice cream, chock full of rainbow sprinkles and cubes of cake, to go inside the pops. They're the perfect sweet treats to add a little bit of magic to a hot summer day.
Cake Batter Ice Cream
adapted from allrecipes.com
1 cup milk
1/2 cup sugar
2 egg yolks, beaten
1 tsp vanilla extract
2 cups heavy whipping cream
3/4 cup white cake mix
3 tbsp rainbow jimmies
1 cup frozen cake cubes*
Mix the milk, sugar, egg yolks, vanilla extract, and cake mix in a medium saucepan. Cook the mixture over med-low heat, until it reaches 160°F, whisking it frequently. Remove from heat and let cool to room temperature. Chill in the refrigerator overnight.
Follow the instructions of your ice cream maker to churn the ice cream. The churned ice cream should reach a soft serve consistency. Fold in the sprinkles and cake cubes if you choose to use them. Scrape the ice cream into a 2-quart plastic container, cover, and freeze overnight.
Or, if you plan to use the ice cream to make the Fairy Wand Pops, scrape the ice cream mixture into a 9" x 9" square baking pan sprayed with nonstick spray and lined with parchment paper. Freeze the ice cream overnight.
*For the frozen cake cubes, I baked the remainder of the cake mix cake, let it cool, cut it up into 1/2" cubes, placed the cubes on a baking sheet, and froze the sheet for a few hours.
Fairy Wand Pops
ice cream of your choice
white chocolate
pink oil-based candy coloring
blue oil-based candy coloring
star-shaped cookie cutter
long lollipop sticks
striped gray paper straws
parchment paper
baking pan
baking sheet
For the ice cream, I used the Cake Batter Ice Cream recipe posted above. But feel free to use whatever ice cream recipe you'd prefer or even use store bought ice cream. Spray a baking pan with nonstick spray and then line the pan with parchment paper (the nonstick spray helps the parchment adhere to the pan).
Make sure the ice cream is at a soft serve consistency (so either use ice cream freshly made in an ice cream maker or let your store bought ice cream sit out a few minutes until softened a bit). Scrape your ice cream into the prepared pan and smooth the top. Ultimately, the ice cream pops should be 1/2-3/4 inch thick, so choose the baking pan that will allow your ice cream to be in a layer that thick. Freeze the tray overnight.
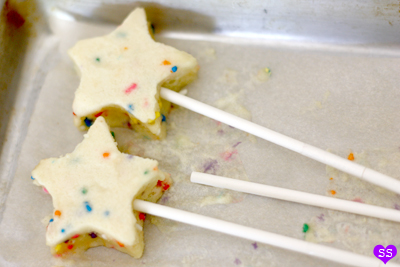
Carefully remove the ice cream from the pan by pulling at the parchment paper lining and place the ice cream (still on the parchment paper) on a flat surface. Cut out ice cream stars with your cookie cutter and place the stars on a baking sheet lined with parchment paper. Stick a lollipop stick in each ice cream star and place in the freezer for a few hours until hardened.
Melt half of the white chocolate. Tint it with a few drops of pink candy coloring. Dip half of the ice cream stars in the pink chocolate. Gently shake off the excess chocolate. Place on a parchment-lined baking sheet and keep frozen until ready to serve. Melt the other half of the white chocolate, tint it blue, and dip the other half of the pops in the blue chocolate. When ready to serve, slip a striped paper straw over the lollipop stick of each pop.
Fairy Star Bonbons
ice cream of your choice
white chocolate
pink oil-based candy coloring
blue oil-based candy coloring
mini star-shaped cookie cutter
parchment paper
baking pan
baking sheet
Instructions very similar to the ones for the Fairy Wand Pops above. Instead though, the soft serve consistency ice cream should be spread in a thinner layer, about 1/4-1/2 inch thick. And use a mini star cookie cutter to cut out tiny ice cream stars. Freeze them. Use a fork to dip them into the pink and blue chocolates. Shake off excess chocolate while still on the fork. Place on a parchment lined baking sheet and keep frozen until ready to eat.
Inspiration:
[Photo Credit: Top image from Sanrio Co. Japan / Bottom image from Disney's Cinderella]


Ahh! I instantly thought of Little Twin Stars when I saw your post on my Blogger Dash. The moment I saw what inspired you, I was seriously screaming with joy, haha! I absolutely love Little Twin Stars!
ReplyDeleteThis is absolutely adorable and it looks DELICIOUS! I'm definitely going to need to invest in an ice cream maker!
So cute !! I love your creations <3
ReplyDeleteCongratulations on surviving your first week of being an M1!! I just finished my first day of dental school! I can't believe I'm a DS1, it's so exciting, and I'm sure you feel the same. :)
ReplyDeleteThese are SUCH a cute idea!
ReplyDeleteHello, I'm from Spain and I want to say you that I love your blog!!
ReplyDeletexoxoxo
http://missjoyerias.blogspot.com.es/
this is really perfect for kiddie parties
ReplyDeleteI totally agree to you frost that these are really an awesome food tool at kiddie parties....I simply love to know an adorable idea of indulging cakes in the ice cream with so elegance....I am going to try this in the coming weekend....thanks for the recipe!!!!
ReplyDeleteIn any kind of kid's party, there's a lot of foods to choose from. But there are kid's that choose to play rather eat their food. That's why we need to be creative in preparing foods. We have to be playful also to get their attention.
ReplyDeleteI love them! Thanks for the idea!i love your blog, is wonderful. :)
ReplyDeleteGreat idea, Susan! Love your blog.
ReplyDeleteThis cake batter ice cream in a stick will be a hit for kids. Also during parties it would be a phenomenon. It is something new that we all can enjoy.
ReplyDeletewebsite hosting australia
I nearly screamed (in a good way) when I saw this. How did you know that I had a strange craving for edible fairy wands?
ReplyDeletethis look so cute
ReplyDeleteThese are just beautiful! So creative and love the fairy wands! I had featured u in the post of Top 7 Kids-Friendly & Lovely Cakes on AllFreshRecipes, expect ur refreshing Eats!
ReplyDeleteSusan we Love your blog and your food.
ReplyDelete