


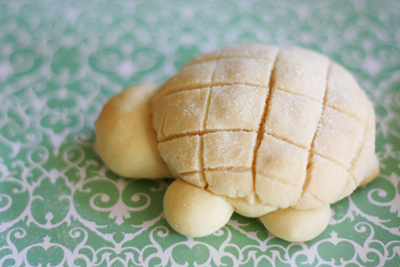
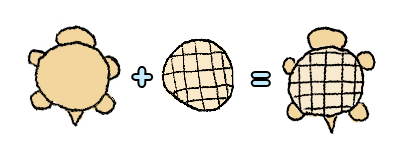
If you have no idea what メロンパン a.k.a. Melon Pan is, let me explain. First of all, in Japanese "pan" means bread. "Melon" refers to the look of the bread, not the taste (although some recipes add melon flavoring to the bread, but that's rare). The criss-crossed surface is supposed to look like the rind of a rock melon/cantaloupe, but in the case of turtle-shaped melon bread, it makes the perfect shell.
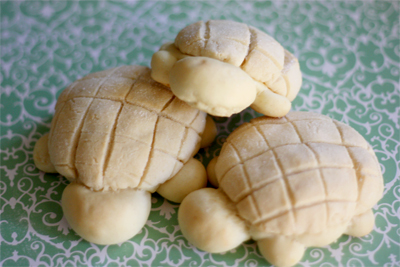
Melon pan consists of a lightly sweetened bread topped with a layer of sugar cookie dough, scored with the checkerboard pattern. I think melon pan is a close relative of Hong Kong's pineapple bun (polo bun), except the pineapple bun tends to have a softer bread base and a more buttery and fragile topping. Melon pan is delicious. But, turtle melon pan is even better!
Melon Pan Recipe
adapted from My Food Geek
1 1/2-2 cups flour
2 T active dry yeast
2 T sugar
1/2 cup water (110 degrees)
1/2 t salt
1/2 stick butter, room temperature
1 egg
3/4 cup + 1 T flour
1/2 t baking powder
1/4 cup sugar
sugar for dusting
Bread Dough: Heat up your water to 110 degrees, basically when the water's hot, but still safe to touch. Add 1 T of the 2 T of sugar to the water. Then add your yeast, mix, and let it proof for 10 minutes (until the mixture is super bubbly). You'll need to divide up your butter and egg. One-third of the 1/2 stick of butter will be used in the bread dough, place the rest of the butter aside for now. Crack your egg into a bowl, mix it up with a fork and pour half of the mixture into another bowl for later (half the egg is for the dough, the other half is for the topping).
Now in a large bowl, mix your dry ingredients together: 1 1/2 cups flour, 1 T of sugar, and 1/2 t salt. By now the yeast should be ready. Form a well in the center of your dry ingredients and pour in the yeast/water/sugar mix. Add in your 1/2 egg and mix. Slowly incorporate the dry into the wet ingredients until a dough begins to form. If the dough is too sticky, add in additional flour one tablespoon at a time until the dough is no longer sticky, but it also must not be too dry.
Gather the dough and place the mound on a cutting board or any smooth surface on which you can knead your dough. Dab the 1/3 of the half stick of butter onto your dough in little blobs and knead your dough until the butter is totally incorporated, when the dough is nice and smooth. Now place your ball of dough back in it's bowl, cover it with plastic wrap, place it in a fairly warm area, and let it rise for one hour.
Cookie Dough: In a new bowl, cream the remaining 2/3 of the half stick of butter with 1/4 cup of sugar. Then mix in the other egg half. In another bowl, mix together 3/4 cup + 1 T of flour with 1/2 teaspoon of baking powder. Slowly mix the flour/baking powder mixture into the butter/sugar/egg mixture until your dough forms (be careful not to overmix). Dump the dough onto a piece of plastic wrap, gather it all into a ball, shape it into a marshmallow-like cylinder, and place it in the refrigerator until firm.
Shaping The Body

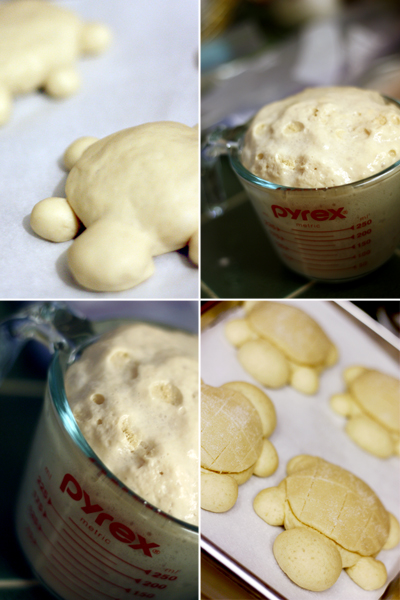
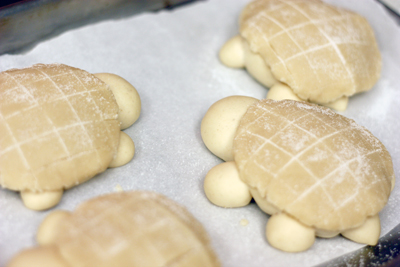
Divide the 1/3 portion of dough into two. Roll one half into a ball; this will be the head. Take the other half and split it into 5 equal parts. Roll 4 of those parts into balls; those will be the feet. Pinch the remaining part into a triangle; this will be the tail. For the body, take the 2/3 portion, roll it into a ball, and then flatten it slightly on the lined baking sheet. Take the turtle head, feet, and tail and place them in the appropriate places on the body (as pictured above), tucking a slight bit of each under the body.
Repeat the process for the remaining 8 lumps of dough. When finished, let them all rise for 30 minutes. Preheat your oven to 350°F.
The Shell
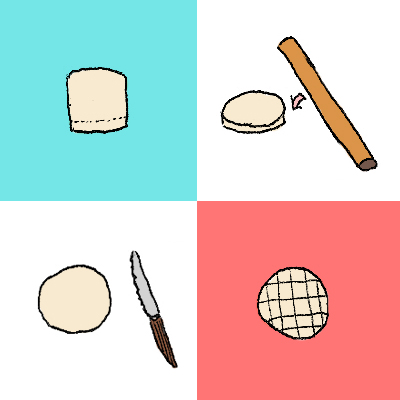
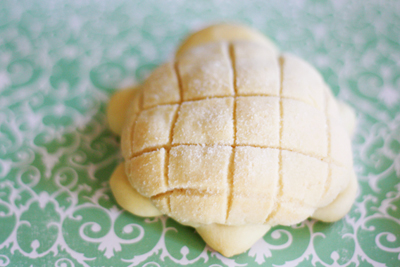
Now take out your cookie dough from the fridge. Cut your cylinder of dough into 9 equal sized circles. Roll each slice out with a rolling pin until it's the same size as your turtle's body. With a knife, gently score the surface of the dough with a checkerboard pattern, be sure not to make the lines too deep or the pattern will split open once in the oven.
Final Assembly

Love your site, very cute! Thanks for the comments you left on mine ~ those PB and chocolate macarons look yummy!!!
ReplyDeleteAnd these turtles are too cute. I love the diagram!
found your blog from soompi ^^
ReplyDeletei must say these are super cute.
just some advice.. i think you should use the follow option on your blog, makes finding your blog easier :)
cookies and cups: Thanks! No prob.
ReplyDeletefrozenfruits: Hey fellow soompier :)! Thanks. Also thanks for the "followers" advice. I just added the gadget to my sidebar!
Hi! I saw your blog on soompi & i really wanted to make this! i was wondering what the T stands for? Tablespoon or teaspoon? thanks!
ReplyDeleteMichelle: Yay, another soompier. Upper case "T" stands for tablespoon and lower case "t" stands for teaspoon.
ReplyDeleteoh they are so cute
ReplyDeleteYOM
ReplyDeletemarissa: Thanks :)!
ReplyDeleteMel: Yup :D.
That is fantastic! I love the little turtles!!
ReplyDeleteHahahaha that is so creative =D Now all you need is a little bit of food colouring, it looks like the real thing. My brother in law is obsessed with tortoise, I'm going to make him this for xmas.
ReplyDeleteLOVE these. There's a bakery I often go to in Tokyo and I get one every time. It's the cuteness.
ReplyDeleteLove the diagrams. A work of art!
justJENN: Thanks! Turtles are awesome.
ReplyDeleteLinda: Haha, yeah green turtles! Thanks.
Mr. P: Thanks for the compliments! I can't wait to go to Japan sometime to see one of these in person.
AHHHH so cutee! i want to eat them! btw, what background are you taking your pictures on? it's so pretty!
ReplyDeleteStephwhY: Thanks Steph! The background is actually a sheet of scrapbooking paper. I had the hardest time deciding which set of patterns to buy; too many to choose from!
ReplyDeleteHow freakin' cute! I love Asian bakery stuff.
ReplyDeleteHands down, one of the cutest breads I've ever seen. Amazing job!
ReplyDeleteJessica: Thanks! Asian bakery stuff rocks. I love looking at pictures of Japanese baked goods, so creative.
ReplyDeleteXiaolu: Thanks for the comment!
Hi! Here from Soompi :)
ReplyDeleteWhen you cover the remaining dough as you assemble the turtles, do you cover it with a damp teatowel or plastic wrap or?
Thank you!
Yen: Hi! You can use anything to cover the dough, damp tea towel, plastic wrap, a bowl, etc. Basically it's to avoid your dough from having too much contact with the air, which creates a skin on your dough resulting in weird lumps when you try to knead the skin away.
ReplyDeleteBut also remember that as you're working, the covered dough will continue to rise, so you also should make sure that there's enough space between your dough pieces to that they don't all merge together. I hope that helps :).
These are adorable, and probably tasty too! Good combo:) Your blog is really cute!
ReplyDeleteSue: Thanks for the comment and positive feedback :D!
ReplyDeleteHEY! =D
ReplyDeletewhere do u get these amazing recipes from? I would think these should be locked away in a vault somewhere in New Zealand or something ...
=D I always stare at the japanese coookbooks that have all the secrets for cute baking but I cant read it -_- TY SO MUCH for posting these <3 forever
LittoBubbo: Haha, I get my recipes from a variety of sources: Google searches, other food blogs, cookbooks, cooking magazines, my mom, recipezaar, etc. (I usually credit my sources under the recipe titles).
ReplyDeleteBut as you can see, I like putting twists on the recipes I find to make them more my own. Originally, this was just a recipe for normal, circular melon pan. My twist was creating my own method to shape the bread to look like turtles.
Hehe, Japanese cookbooks are awesome. Except my Japanese is not as good as I would like it to be... but Japanese cookbooks with lots of pictures are often helpful if you're curious about a certain technique or something.
>w< they are really cute
ReplyDeleteI thought it was an excellent blog, that information has been very helpful in my life, I am a desserts lover, so I really enjoyed this reading, this weekend I want to do one! Thanks for this great moment!
ReplyDeleteAnonymous: Yay, thanks.
ReplyDeletewine racks furniture: I'm so glad you found all of this helpful! Desserts are the best, haha. I hope you do try some of these recipes out! Let me know if you have any questions.
So cutee! I love bread and I love love love turltes!! I think I'll make thses this weekend. THanks for the recipe! Your site is adorable
ReplyDeleteThese look so cute and good! Thanks!
ReplyDeleteI love this recipe, but mine never rise right, so it's always really flat and really dense. D:
ReplyDeletechococraze46: Haha, turtles are cute. No prob.
ReplyDeleteCreatiKnit: Thanks!
theskythief: Perhaps there's something wrong with your yeast? Or it's too cold in your kitchen, so the bread rises really slowly? The bread dough must rise properly pre-baking or else it won't puff up properly while baking.
What does T and just t mean?
ReplyDeleteMy bread ended up tasting like pizza bread o_o is that how it's suppose to taste? I'm so worried I didn't follow the instructions rite :(
ReplyDeleteOh my god!!! I soo much love your blog, specially the illustrated instructions, my favorite!!
ReplyDeleteCongratulations keep it going girl!
hehe I made some yesterday :) mine were pretty lopsided though...
ReplyDeletebut they're really yummy!
Wow! I made a batch of these two days ago and they were so delicious. I'm making another batch today to take to my parents. Thank you for the recipe!
ReplyDeleteThanks so much for this recipe, it was delicious! I made 5 turtles, and 4 original-looking ones, my parents and big bro loved them! The turtles were adorable <3 Thanks again!!! =)
ReplyDeleteOh m geeee!! This was so fabulous... I loved the little infographics that you made!!!! I cannot wait to make these myself. I am so excited. AIYEEEEEEEEEEEEEEEEEEEEEEEEEE!!!!
ReplyDeleteHow big would you say one melonpan is?
ReplyDelete